


Okay, so let’s talk about how I put the orange ribbon on our cheap blackout vinyl shades.

Yes, I promise these are room darkening shades. It might not look like it in the pictures, but they do help darken the room significantly (not completely, though) even when the Texas sun is shining at its brightest.
When left plain, the roller shades were boring and kind of yucky. The orange ribbon does wonders in brightening them up and giving them a purpose for life other than keeping a baby asleep.

It all started when I searched through Pinterest for inspiration for adding ribbons to roller shades. I knew I wanted to go that direction after I saw what Janell did with the roller shades in her daughter’s room. But I just couldn’t find metal pulls for roller shades ANYWHERE on the internet. The only store I could find was completely sold out in pulls.
That’s why I was thrilled when I saw this photo on Pinterest:

And I became even more excited when I clicked over and found this awesome tutorial. Kathleen shot a video of her working on her roller shades and even included a handy template for the squares at the corners. Let me tell you, that template definitely was needed by someone like me who fudges measurements on a regular basis! I changed some of the measurements, though, because my ribbon was thinner than hers and I wanted smaller squares.
Her video was so helpful in showing me how to fold over the corners just so that they looked great. Even though her video has no captions or a transcript for deafies like me, I was able to follow her process. If you’re looking to make something like this, I highly recommend you to watch her video first!
She used hot glue to attach the ribbon to her shades. I didn’t want to use hot glue because I don’t have hot glue and I have slightly traumatic memories of how messy and hot they are from my high school years (long story, but basically my class sold crafts for our fundraisers).
I thought I would just do exactly what she did, but with fabric glue.
First, I pulled the shade completely down while still on the window and made marks so I knew how much of the shade I had to work on. The full length of the shade is much longer than my window, but that’s fine. (Note: you can get roller shades cut down to fit the length of your window for free at Lowe’s.)

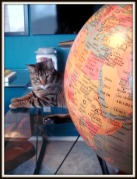
I had to keep my cats out of the room or they would attack the ribbon. Tala, however, did not understand that a closed door meant no playtime.

I started to work on the ribbons, but thought I would first test out using the fabric glue to attach a short length of ribbon on a piece of paper. I wanted to make sure that the glue wouldn’t bleed through the fabric.

I am so happy I did the test, because the glue did indeed show through!

It looked messy and yucky, so I knew that I couldn’t attach the ribbons on the shade the way Kathleen did (if you didn’t watch her video, she measured everything out on the shade and then hot glued the ribbon right on top of the shade, folding and twisting the ribbon as she went).
I stared at the shade and the ribbon for a long while, wondering what to do next. Should I just suck it up and buy a glue gun? But my ribbon is orange and thus lighter than Kathleen’s dark navy blue ribbon. Maybe the hot glue would still bleed through my ribbon?
Hey… what about Heat n Bond?

I experimented with folding down the corners using tiny triangular cut-outs of the Heat n Bond.

And what do you know – it worked! It required a bit of ironing and folding and cutting, but it wasn’t too bad. I would recommend that you add the Heat n Bond on both sides of the corners, so there’s no flapping around and it’s all nice and tight.

Another important tool that helped me with handling the ribbon was this magic in a bottle!

The heavy starch really firmed up the ribbon so it was easier to handle. If you’re doing this project, you MUST use heavy starch.
Progress was being made.

I did two corners and then just laid the ribbon out on the shade to make sure everything was looking good. It was.
I then decided to iron some Heat n Bond on the cross-over part on the corners just to make the ribbon a little easier to handle and to make sure everything was nice and straight.

Finally, all four of the corners were done!

Then my next dilemma was… how the heck do I attach the ribbon to the roller shades?!
I had some cut up roller shade vinyl material (from when we got them cut at Lowe’s) so I decided to experiment with it. First, I thought maybe ironing on Heat n Bond would do the trick. But the hot iron just melted the vinyl! I kind of expected that.
Maybe I really needed hot glue… but I was stubborn and besides I didn’t have the car that day (we only have one car and Nick had it for work that day). I decided to squirt out the fabric glue on a plate and use a brush to apply the glue on the fabric.
No bleed-through! Whew.
Gluing the ribbon on the shades was the easiest part. I just had to measure everything out on the shade to make sure that everything was straight and centered. Fabric glue doesn’t dry very fast, so I had plenty of time to brush all the glue on and move it around until it looked just right.
I thought and thought about the tiny window and whether I should do the squares too or just keep it simple…

Obviously, I kept it simple. Looking at it now, I kind of wish I did the squares too, but then I might still be working on it right this second… so I’m glad I went the simple route and it’s all finished now!
One final thing – when the sun shines through, you kind of can see the folded corners:

I think it’s because of the light color of the ribbon. If you were to do this project, I would probably recommend a darker color, like black or navy blue or even red. But it doesn’t bother me all that much.
In all, it was a fun project and it was CHEAP! The roller shade was around $10, the ribbon (I had to buy two) cost me around $2.50 each, the glue was, what, a few bucks, the heavy starch… another couple of bucks. I already had the Heat n Bond but that would be just a few dollars, too. After doing some advanced math, I think we spent around $20 on this shade.
I had everything left over as well for the second window.. and the tiny roller shade cost us around $7. So that’s $27 for two roller shades. Not bad at all!
Next project for the nursery… the dresser! We’re Nick’s almost done working on it! I can’t wait to show it to you.
Linking up for the Window Treatment Challenge at the CSI Project…
![]()
Filed under: beauty!, Before & After, DIY, Nursery, Tutorials/How To |


That looks FABULOUS. I love the pattern! Its perfect with the drapes.
but woun’t the ribon make the shade roll to the side, we call that telescope.
No problems so far, it rolls up and down just fine!
Great name for that, by the way – very visual 🙂
What a great idea and they look great.
LOVE your little kitty playing under the door – so cute.
Oooh I love how custom they look! So fancy. They just add that perfect extra touch. Great job!
Love the roller shades!! The ribbon looks so good!
I am so impressed, especially knowing you got down on the floor in your pregnant state to lay out the ribbon.
Great job! I seriously love this idea! I need to do something like this for my son’s room! Thanks for the idea!
Love what you did here- want to come do some in my house too? My windows are dying for a makeover 🙂
Haha if I can do it, you can, too!
[…] Today, my ribbony roller shade tutorial is being featured at the excellent blog, A Brooklyn Limestone in Progress. Be […]
Gorgeous! Love the (curtain) fabric and the orange ribbon is done so beautifully! Super Job!
LOVE it! Wondering if I have the patience to tackle such a project…Pinning it for future reference, fo sho!
This looks absolutely marvelous! I’m sure you won’t mind if I try your idea:)
Please do try it and send me a picture!! 🙂
Hi love the shade… but where did you get the curtains??
Thanks!!
I made them with Covington Wilmington Multi Fabric – hope that helps!
a fantastic post! I am sending it to one of my clients, and bookmarking it. Thanks!
I love the sweet simplicity of this project. and the corners showing through look kind of cool in a way to me. Regardless, awesome project and great tutorial 🙂
Ok, you are on here twice from The CSI Project… LOVE THESE too!
FABULOUS! Love it! and it’s always nice to learn about new products…might have to give that fabric fusion a try!
–Katie
@ Creatively Living
Your shade looks so good! What a great idea. I have some roller shades that could use a facelift too.
Oh so pretty, I love the color!
I’ve been wanting to try doing something similar for a long time (but using wide black grosgrain ribbon just along the edge). Do you think it would roll up properly?
It should! Interestingly enough, my large roller shade rolls up and down perfectly but its a bit harder to roll up the small shades (for the tiny window). If your shade is a normal size, it should work great.
Thanks!!! 🙂 I can’t wait to try it. I’ve totally blown my decorating budget for this month, but maybe in June! xoxo
[…] Go to What the Vita […]
One of the best tutorials I’ve seen, thanks!
[…] better than a ribbon border in your choice of color, texture and design? As seen in this creative tutorial, with the help of fabric glue, Ashley Blinds roller shades, an iron and ironing board, and some […]
[…] in and peek inside. You’ll see another tiny roller with the royal ribbon treatment. I also think this photo represents the orange in the closet the […]
[…] art is right across our curtains, so it picks up all the colors. The frames also makes our walls look […]
Hi colleagues, good post and pleasant arguments commented here,
I am truly enjoying by these.
[…] (Ribbon embellishment on shades via What the Vita) […]
[…] (Ribbon embellishment on shades via What the Vita) […]
[…] What The Vita […]
Beautiful. I will try this on bedcover
[…] What The Vita […]