


I have a few ideas for DIY art for my home, but pre-stretched canvas can get expensive fast.
Allow me to demonstrate. A standard 4 feet by 8 feet birch plywood, 3/4 inch, will probably cost you around 40 bucks. A pre-stretched canvas in the same size might cost you around 150 to 250 bucks, depending on the quality of the canvas and where you buy it.
Now, if you cut up that piece of plywood into four 2 feet by 4 feet pieces, you would have four surfaces ready for artwork for the same price: $40. To buy a 2×4 (or 24×48, in inches) canvas, you would have to fork over around $20. For four canvases, $80.
I want to do a painting for the space above our bed with plywood and latex (wall) paint, but I wanted to see if these elements would work well in creating an art piece. I didn’t want to do all the work just to end up with a disappointing result.
(Why latex wall paint? Well, I have a very specific color palatte that I would like to use for the painting for the bedroom, but I have no idea how to mix acrylic paint colors. I’m not an artist. It’s easier to get the specific colors I want from Home Depot than mixing them myself.)
I found a small piece of plywood smiling up at me in the garage so I said to it, “Plywood, you shall be experimented upon.” Don’t worry, no plywoods were harmed as the result of this experiment.

I started with a piece of plywood, gesso, sandpaper, and wood filler. Not pictured is primer spray paint.
The first step was to make it smooth as can be. My plywood had splinters on the veneer, so I tried to sand them down with grit 80 sandpaper, but the splinters didn’t go away and I created new splinters.

I tried 120 grit sandpaper and it worked so much better! Too-high grit sandpaper and plywood don’t play well with each other, apparently.

Some really big splinters were filled in with wood putty.
The edges of the plywood are… well, it’s plywood, what do you expect?

I read somewhere that you could add wood putty to fill in the edges to make them look more solid. I thought I would try it.

I let it dry completely and then sanded it.

Not perfect, but much improved.
Then I primed one side with primer spray paint, along with the edges. I ran out of the primer so I couldn’t do the other side, but that was fine because I wanted to experiment with gesso and see if it was better to apply primer on plywood before adding gesso or if primer was really unnecessary.
Finally… it was time to put on the gesso!
(If you’re wondering what gesso is, read this.)
See how thick it is:

That’s from the seal on the bottle. So thick. You can use it to give your painting some texture, like I did on one side (more on that later). You could thin it out with some water if you want a smoother coat.
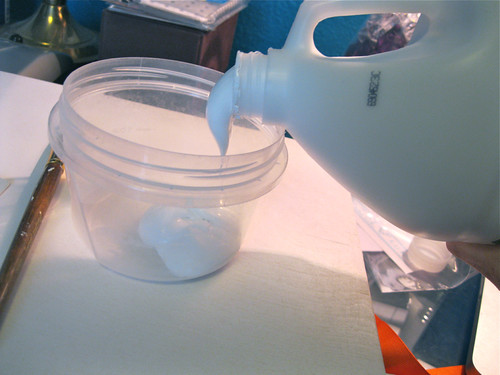
See how thick it is. And you can see the primed side of the plywood in the above photo.
Then I just used a small paint brush and put the gesso on the plywood – thickly. I wanted to add some texture to the final painting.

And on the other side (which was unprimed), I brushed the gesso on carefully to make it as smooth as I could. I wanted to see which application looked better. After two coats, it looked like this:

It’s not as opaque as the primed side, so I had to do a third coat. it’s now 100% white but the texture is a little weird, almost like the wood buckled a little in some areas, a little wavy. I would definitely do the primer first for future plywood paintings.
Ok, finally ready to start painting!! I’ll show you the final result and how I got there in a later post. This post is too long already!
I won’t hestitate to do future DIY art on plywood. It’s pretty easy to do and the savings are great! But sometimes there are great sales on canvas that I just can’t pass up… such as this one at Michael’s:

Buy one at regular price, buy second one for a PENNY. Isn’t that crazy?! I think I will stop by there tonight and pick up a couple. Why not?
(Check out your local Michael’s if they have this sale, too. This sale lasts until May 19.)
Filed under: Austin!, DIY, Paint: The Enemy (and best friend), Tutorials/How To |


go check out another store for canvas, I saw a bunch of BIG ones for a very good price, Jerry’s Artarama – its a dangerous store 🙂 I go in and I buy buy buy buy buy, I hate you Jerry’s Artarama box of 20 18×24 Stretched Canvas is at 78 bucks (about 3.90 per) and a box of 6 36×48 Canvas for 215.00 which comes to 35 per (give or take a few cents – let Nick do the math 😛 ) but a gesso board is a great alternative I think too.. I just don’t like the weight 😛
clyde
Thanks!! I will definitely check that store out, it really sounds like a dangerous place though 😉
I agree with you about the weight of plywood – but there’s some hollow plywood boards that might be lighter.
Looking forward to seeing your results.
(Why latex wall paint? Well, I have a very specific color palatte that I would like to use for the painting for the bedroom, but I have no idea how to … fobedroom.wordpress.com
Thanks for the tip, am doing up a ply that covers our AC wires. Could you also share if you added a thinner or something to the Primer you used, Coz when i used it, it was very thick.
So there’s no problem with putting acrylic paint over the oil or more permanent based nature of an aerosol primer ?
this is such a helpful article.
Thank you so much!!
It’s my first time painting on plywood and I wanted to see what “gesso” would look like on before I did it.
I am going to try painting without it first and see how it comes.
Thanks!!!