New Rug Leads To Some More Hard Decisions

My life is so hard.

We just found the perfect rug for the laundry room… and that forced me to make some hard, life-altering decisions. But now I look back on it and realize that it was the best thing to ever happen to me.

Okay, enough with the silliness. LOOK AT MY NEW RUG! YAYYY

IMG_3999

The rug is from Urban Outfitters. I really enjoy their rug selection – the rugs are always well-designed and reasonably priced. I’ve been checking their website constantly, hoping for a suitable rug for either the laundry room or the green bathroom.

I was really thrilled to find this rug – the colors are PERFECT for the laundry room.

IMG_4000

The blue on the rug is a CLOSE match to our walls… it’s basically a shade darker of the same color. It’s serendipity, I tell you.

And the dark gray… you know it. Goes perfectly with our dark gray cabinets.

IMG_3184

I’m frustrated that I can’t get a photo showing both the rug and the cabinets. Close your eyes and visualize the previous two photos on top of each other. That’s what my laundry room looks like! YAYYY

Of course, a new purchase for the house ALWAYS leads to more decisions that we need to make. I’ve been thinking about choosing fabrics for the laundry room for a while, but wanted to wait until we got a rug because it’s easier to find fabrics to go with a rug than to find a rug to go with fabric choices.

For now, I needed to find two fabrics for these two purposes:

fabric locations laundry room

I just went straight to Tonic Living, because I really like their fabric selection. There are many other online fabric shops, but they have SO MANY FABRIC CHOICES that it’s easy to get overwhelmed at these sites.

I still got overwhelmed at Tonic Living with all the great fabrics, so I just narrowed it down and down until I had several choices. Then I put them all around a photo of my rug. I used the Pages application for this step.

fabric dump

clockwise from bottom left: 1, 2, 3, 4, 5, 6, 7, 8, 9

As you can see, I also put a dark gray background at the top and a light blue background at the bottom to see how the fabrics would look with our two main colors in the room.

Then I chose my four favorite fabrics and played with them:

fabric choices 1

fabric choices 2

I really like both choices, but I liked the second one slightly better. I did a mock-up of the whole room in Pages just to see how everything would look together, along with some more additions to the room that we’ll make in the coming weeks.

laundry room design 1

This really helped me visualize the room. I played around with all kinds of fabrics, colors on the shelf, the colors for the shelf itself and the folding counter, the hanging bar, etc etc. I finally landed on this design and it has been NICK APPROVED. YAYYY

I just had to torture myself some more and do the other side, too:

laundry room design 2

That little door with the hole in it will house our cats’ fancy litter box. The design isn’t final yet – it all depends on Nick’s progress there and what he figures out as he goes along. That part will be his project.

After all of this hard work, I feel an odd sense of peace. The path has been set – we just need to walk it. YAYYY

I’ll order the fabric samples just to make sure they look good in person ($1 each at Tonic Living) and continue trying to figure out a lighting solution for the room. I’m leaning towards buying a metal pendant from a big box store and spray painting it yellow.

I’ll be back on Thursday to show you another little addition to the laundry room! We gotta hang it up first (that’s a hint). YAYYY

Finding a Home For My Swirly, Colorful Painting

I thought it was time to get started on the art for our living room. I saw this beautiful art installation at an Anthropologie store in Austin (at the Domain) and I wanted to recreate it for our home.

art at anthro

It’s much more majestic in person – it’s huge, spanning the entire wall behind the cash registers, and it’s outlined in gold paint.

But I didn’t want to get started on this without doing a test drive first. What if it didn’t look good in our living room? And what colors would I use?

So, I did a much smaller version of the artwork.

sketch for art

With the help of the photo of the artwork on the laptop, I sketched out this outline. But before I put pencil to paper, I put tape to define the art space and to divide it into three parts to fit into our three large frames in the living room. If you look closely, you’ll see the tape – along the bottom, the top, and between the three sections. You can see the tape better in the next photo.

tape on painted artwork

It was hard trying to choose the colors I wanted to use. I also was somewhat limited by the acrylic colors I had and they didn’t take too well to color mixing, or I don’t know how! I wish I took color theory or something in college. I took a bunch of drawing classes, but no painting ones. Regrets, terrible regrets.

The tape was really helpful when it was time to paint. As you can see above, I painted over the tape and then it was easy to remove the paint from the tape. All I did was to add a bit of water to the tape and then wipe it away with tissue.

no paint on tape anymore

I wasn’t completely happy with the color choices I made, but this is what I ended up with:

completed artwork... hmm

Now it was time for the big test. I brought it to the living room and held it up to see how it would look in the space.

My face looked like this:

Old photo of Janella - from late November, when she was around 6 weeks old. She was so tiny!

It didn’t look right. The art was whimsical and the living room was more simple, modern, and had clean lines. The painting, not so much.

But I did like the painting. So, I thought about where else in the house I could put it in. I held it up at different places and finally arrived at my bedroom.

Here’s what it looks like (sorry for the MESSY bed and the blurry shot, I was holding a squirming Janella in my arms).

painting over bed

I think it works better in there, but the bright colors don’t really go with our chandelier. I downloaded a free trial of Photoshop Elements and played around with the colors.

painting over the bed, after photoshop

I think this could work! I can add outlines of silver paint, like how the original art did with gold paint, and paint the sides in silver as well.

I have a few large pieces of plywood in the garage that I’ll use for this project. Since I’ll be using plywood and not canvas or paper, I think wall paint should work just fine. This gives me much more choices in colors without worrying about color mixing!

Off I go to Home Depot or Lowe’s to pick up a few paint chips and figure out a good color scheme.

I’m not sure whether I will be doing a triptych for this room or do it on one large piece of plywood. Let’s see. What do you think? I also plan to add mirrors behind the lamps on both sides of the bed. Maybe round mirrors to offset all the sharp lines. We’ll see…

It’s great how doing small-scale samples can help us make better decisions for our home. Along with the help of technology, of course!

What will we do with the still-empty frames above our living room sofa?

ribba frames

Do another small-scale painting, of course. I think I will try making some swirly black art, like I talked about 3,221 years ago. I thought I should go with something with a bit more color, but my original plan is probably the best one. Funny how that works out.

Plan for Guest Bedroom Finalized! Now I can sleep…

Last night, while I was in bed and hoping that Janella would make the transition to the crib successfully (she did! yay!), I decided to formulate some kind of plan for the guest bedroom.

Why now? Aren’t we focusing on the laundry room?

Yes, but the cabinet painting is taking forever (I can only get an hour or two every night, but only if Nick gets home early and doesn’t have any work to complete at home) and I feel like I’m not productive, even if I’m making progress, because it ISN’T DONE YET.

Making plans — now that’s very productive. At least, it is to me. So, that’s what I did last night.

Instead of just showing you my plans and walking away, I’m going to take you through the process of planning. I’m not a interior designer (dream job!), but this is a good way to see how a few pictures of inspiration can really help you get ideas for a room design.

Here we go.

The Room:

Sorry for the bad picture. It’s hard to take a good photo when the light is so strong and when I took this, the roller shade wasn’t in yet.

The Process:

I just opened Pages on a whim and wanted to see if I could make an image that resembled my guest room using shapes like squares, triangles, and circles…

guest bedroom 1

Not half bad. It’s not Photoshop, but it works in giving me a nice visualization of the room.

I originally thought I wanted to paint the nightstands white and add white curtains, but this photo made me go BLAH. Too much white.

I went over to my Pinterest and looked at this duvet, which I really love but won’t buy:

amazon

I had pinned the image to help inspire the room. So I looked hard at the colors. I already had the yellow in the lamps and the blue on the walls, but the kelly blue on the walls is much darker than the light blue color in this duvet.

I thought of the light blue paint we used in the laundry room… maybe that would work on the roller shade? Maybe stripes of light blue?

Not bad. But these nightstands are killing me. They are SO BORING.

Looking at the duvet again, I thought about painting them a coral color. Really? Coral? Would that work?

I LOVE IT. Okay… coral it is. Never mind it’s a trendy color and might turn into the avocado green of the ’70s by next year. Besides, I really love avocado. Eating it, I mean.

Then I was stuck again. And I didn’t really dig the roller shade plan. The color was still not 100% right.

Back to my Pinterest board, where I found this image that I pinned because the wall color reminded me of the guest bedroom.

brynalexandra

I love how the green pops against the dark blue wall.

Green? Green!

I like it so much better.

But now I’m not sure about the stripes. I know Nick’s not a big fan of stripes and even though I love stripes, I wanted something a bit more unexpected.

I looked at the above image again… and was inspired by the floor pattern. Maybe it would look good on the shade?

Eh, not bad, but not quite there.

How about this?

Yes, I like it!

Great. Great. Okay… what’s next? Oh yes – I had planned to add two frames on both sides of the window and put my hippie cloth tarp thing that I’ve held on since college. The colors in it is really pretty and it’s free.

I didn’t have a photo on hand, so I just googled “hippie sarong” and found this fabric. Close enough…

But it doesn’t mesh with the coral nightstands and the roller shade. Everything kind of felt preppy and the hippie feel in the frames just didn’t work.

Oh! What about black swirly art that I posted about a while ago and was thinking maybe doing for the living room? What if I did them for the guest room instead?

Better than the hippie art, but not quite right, either. The lines on the shade is pretty severe, so I needed the art to be softer. And maybe colorful too, since everything else in the room so far is just one color.

Soft… colorful… Flowers?

Of course, it couldn’t be boring flowers. Nick would never approve.

I immediately thought of this photo that had popped up in my Pinterest feed (do you call it a feed? the pins that you get from those you follow… is that a feed?) that I admired but didn’t pin:

design sponge

I went back to Pinterest, found the painting, and pinned it.

And added it to the frames:

guest bedroom mockup

Yes.

I’ll work on this room probably in 2013, but it feels so good to have a clear plan for it that I love!

What about you — what’s your process when you design a room? Do you use inspiration images or are you a design genius with 1,323,743 ideas in your pretty little head?

Some ideas for your next DIY rug!

I love rugs. I especially love rugs that have a bold pattern. I really love the rug we bought for our living room – it brought the room to the next level.

(Lol at these unfilled frames. I really gotta get going on these very soon!)

But rugs can be expensive. We were lucky to snag our rug on sale, but it still wasn’t a drop in the bucket. That’s why I’m really in love with the idea of a DIY rug. The possibilities are endless… and it’s 100% custom!

We need a large rug for our game room and I think DIYing a plain rug will be a great move.

We all know the results can be beautiful, as evidenced from the following rugs that were made over by some amazingly talented people:

Cristi of Charm Home Design made this rug for her son’s nursery using contact paper.

diy rug pattern

McLaura of Ramblings around DC and Beyond made this rug with a homemade foam stamp. Clever!

diy rug pattern

Ainhoa of A Little Bite of Everything made this rug using a stencil that she made. Go over to her blog to download the template!

diy rug pattern

And who can forget this gorgeous rug painted by Hayley at Hayley Anderson Photography ? She used lots and lots of green tape.

diy rug pattern

Inspired by these (and many more others) rug creations, I’ve been keeping an eye out for great rug patterns that I can emulate. Here are a few that I’ve pinned. (Follow me on Pinterest!)

This rug from the May/June 2011 issue of Lonny is just beautiful! This could be done with a homemade stencil.

diy rug pattern

That issue was full of gorgeous rugs, actually. Here’s another one that I liked – this would be great for a playroom or a nursery.

diy rug pattern

It would be a lot of work (and lots of tape!) to make that one, but it could turn out to be very cool. The hexagons could be bigger to make it easier, and the colors limited to three or four shades.

I also love finding great patterns on painted floors, like this one from House Beautiful:

diy rug pattern

That could be a sweet rug!

I like to look at rugs that are for sale and dream about DIYing them…

Like this rug from Weego Home. It’s fun, it’s funky, and it’s out of my budget at $1495.00.

diy rug pattern

But wouldn’t that be fun to make? It would definitely have to be a free-form job, so if you’re good at free-form drawing or painting this would be the perfect DIY rug design for you.

I liked this simple striped rug showcased by Molly at molly loot:

diy rug pattern

The colors aren’t all that great, at least to me, but I like the addition of an extra tiny stripe every other thick stripe. With some great colors, this could be a cool DIY rug design.

And it seems like I can’t do any kind of round-up without including something from West Elm! This cute rug could be very easy to DIY – and you wouldn’t need a stash of tape or a stencil. You could just wing it and come up with something similar.

diy rug patternAll I’ve gotta do now is to find a really large, plain, light-colored flat-woven rug. Easier said than done, but I’ll find it… somehow, someday, somewhere.

Have a great and productive weekend! I’m hoping to make some serious progress on the laundry cabinets

Five Goals For a Beautiful and Functional Home

With a baby, the days whip by. The weeks are short and the months disappear.

If I can complete one thing off my to-do list each day, just one thing, it’s a productive day.

And when it’s a house-related thing? Then it’s an awesome day.

I’m determined to continue making progress on our house, no matter how slow the progress may be.

With that, here are our 2012 goals for our house:

1. Make each room functional. We have a total of nine rooms in the house, not counting closets and bathrooms. I would like for every room to be functional and useful by the end of the year. Our laundry room needs cabinets and storage solutions. Our office bookshelves could hold so much, if only we finish it. It’s also a bit hard to work in the office without an office chair, so I’ll need to reupholster the chair. The garage is just one big space where messes happen, so we need to install cabinets, shelves, and a ceiling storage solution.

garage ceiling storage systemvia

2. Paint the last spaces in the house. We’re so close to being done with painting! Our master bathroom is still waiting for its dark purple paint job (we already have the paint ready) and then it’s on to our master closet, the pantry, the shelves in the laundry room, and the closet in the guest bedroom. Oh, and the garage. Then we’re 100% done! Until I decide to change the color of a previously painted room. Ahem, let’s not go there right now.

3. Stop buying pieces that need a makeover until we’ve completed all of our projects. Let’s see – we have that bench in our bedroom, the nightstands in the guest bedroom, the bar cabinet for the dining room, frames to be spray-painted, and a couple of lamps waiting to be painted. No more stuff from thrift shops or Craig’s List until we finish them all. But what if we find the perfect side table that we need for our living room for only 5 bucks? Well, unless we find a mega-deal that we can’t just pass up, I’d like to focus on what we already have.

4. Work on our art gallery walls. We’re currently collecting pieces and frames for our game room art gallery and I’ve already spray-painted a couple of frames white for our bedroom. We also need to start buying black frames for our stairway. We’ve been talking about these three art gallery walls for a while – this is the year to start actually putting some holes in the walls.

game room painted

5. Add more COLOR. Our living room is gray and yellow, our dining room is gray and yellow, our bedroom is gray and white, our office is gray and teal… you get the picture. We’ve been collecting a lot of gray and simply colored pieces and the rooms are coming together nicely, but now we need lots of more color, in varying shades, to pump each room up. We’ll be doing that with accessories, pillows, window treatments, and some painted furniture here and there.

I feel really motivated after writing out this list! I think it’s manageable… and actually possible!

But it would be a lot easier if Janella started taking 2-hour naps again. What happened to your 2-hour naps, J?

Something new, something old, and something blue…

They’re here!!


Our new washer and dryer are here! Beautiful, front-loading, WHITE machines. Love them. Washing clothes has become fun again! (I wonder how long that’ll last…)

We got them on sale, almost 50% off, thanks to Black Friday. American consumerism, I wuv you.

Our washer broke unexpectedly, so we had to get these new machines. And we sold our dryer on Craig’s List for $40. It was noisy and old. We’ll put that $40 to use in the laundry room.

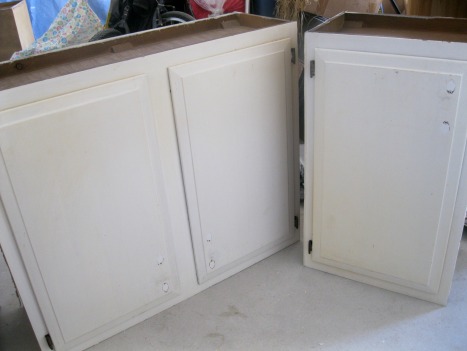
With the new washer and dryer, our plans had to be tweaked a little. I measured everything out and also measured our cabinets. Since our three cabinets are in three different sizes, I had to think about how to arrange them.

One cabinet is 36 inches long with two doors, one cabinet is 18 inches long with one door, and one cabinet is 24 inches long but only 21 inches tall (the other two are 30 inches tall). So I played with all of the possible arrangements (see the drawings along the right side of the paper).

Originally, I had planned to push the washer and the dryer apart on two sides so there would be space in between for our cat litter. But when I looked at the possible cabinet arrangements, it made more sense to have the empty space on the left side.

Then Nick came up with a great solution for the cat litter (more on that later… want to see if it works out before sharing it with you all), so I changed our plans. We’ll put a small shelving unit there to hold our dirty towels and sheets. Something like this, maybe.

You can see what cabinet arrangement I picked by the very obvious circle. I think it makes the most sense and the door and knob arrangement is the most pleasing to the eye… at least, to Elisa’s eye.

We have plentyyy of space next to the machines, so the next step is to either find an unit to fit in there or make one ourselves. We’ll see…..

Right now, I’m working on sanding away the drippy paint from the cabinets. I’m relieved that I don’t need to buy paint stripper – the sanding seems to be working. I’m not worried about sanding away ALL the paint – just the bumpy parts.

Whoa – how’d that picture of Janella get in here?

Two of the cabinets are sanded down and smooth and ready.

OK, I’d better go and sand down the last cabinet. And prime. And paint. And put them up on the wall. And buy the knobs. I’ll probably only enjoy the knob buying part.

Laundry Room: Painted! What’s Next?

Thanks to Dad Vita (Nick’s dad), the laundry room is painted! Thanks to Mom Vita (Nick’s mom), the laundry room is spotless! (Please ignore the cat litter in the picture – we have plans for that)

We love the color and we love that it cost us only $2.00 even more.

What’s next? Oh, just a couple of things.

We got this light from IKEA on sale for only $15. It’s a little long, but it works for us because we’re short people not freakishly tall. However, I am still on the fence because I do think it can get in the way when transferring clothes from the washer to the dryer. Plan B for the light is for it to reside in our closet bookshelves.

But the gray color, eh. I want a yellow light! I want to spray paint it yellow. Help me to convince Nick. Hey, Nick, I’m not pregnant anymore. I can do the spray painting from now on. Cool?

Check out our linen shelves. I can’t call it a linen closet when the shelves are so slim and there’s no door, so linen shelves it is.

I asked Dad Vita to not paint the whole thing because this is my vision:

via

We’ll lengthen the shelves so they’re flush to the wall (more storage!) and paint the insides either black or a dark gray. With some trim and cute weaved boxes, it’ll be a linen “closet” I can finally be excited about. I hope we can tackle that soon!

Next to the linen shelves, we’ve got a long wall of nothing. Except for that pretty blue color.

We got four Ribba frames and they’re waiting for me to add the symmetry art I made a while back. I had planned to print them at a local Kinkos and ta-da! But that didn’t work out because of corporate greed. I am one of the 99%! Ah, I will discuss that later, but basically it will be much cheaper for me to just paint it instead of getting it printed. Later, later. Soon, soon.

This wall next to the washer is empty and sad as well.

A friend (Erin!) had this genius idea of putting a fold-able ironing board on the wall, so when we (Nick) need to iron, we (Nick) could just pull the board down and iron away instead of lugging it to the game room. But would we (Nick) appreciate the fact that we (Nick) won’t be able to watch tv (ESPN) while ironing? Hmm, I will need to think (ask Nick) about it.

I LOVE our cats but HATE the cat litter situation. The cats use the litter box just fine, but they track the litter bits everywhere and the laundry room is supposed to be a place where things get clean, so it just doesn’t make sense to have the cat litter there. But there’s nowhere else in the house to put it! So, I want to design something between the washer and the dryer so that it houses the cat litter AND prevents litter tracking everywhere AND is covered up with prettiness. I hope we can achieve all that.

Dad Vita also painted the ceiling… in our usual light gray color. I feel bad for the next owners of the house – they probably will hate our light gray ceilings because most people like white ceilings and grumble about painting all the ceilings. Sorry.

I told Dad Vita that I could tape the ceiling off for him, but he gave me a Look and said that he could cut in just fine. I laughed and said, “Our walls aren’t like your flat walls in Pennsylvania. Our walls are textured and it is impossible to paint in a straight line.” He said something to the effect of “Watch me.”

Well, he was right. His painting job is perfect. Too bad most of the rooms in the house are already painted or I would have postponed his plane ticket back home and asked him to paint everything. His trick: paint the wall paint and let it spill over to the ceiling, and then go back and remove the spillage with a wet tiny brush. Genius. And I can’t believe that it worked.

So. That’s where we are with the laundry room. The next step is to tackle these cabinets.

I will need to sand off the old paint (bad drippage), if possible. I hope I won’t need to buy paint removal chemicals.

Only if this little cutie will allow me to finally tackle this project.

Finding a Place for Mother Goose, Dr. Seuss, and Their Friends

We love books and we know our baby will love to read as much as we do. That’s why we asked our guests at our baby showers to bring a book along with a gift, so we’re off to a great start with piles and piles of books!

I cannnnnot wait to watch Nick read to our baby. (heart melts)

But how to store these books?

After searching Pinterest and blogs for ideas, I had several options:

Option #1: Use rain gutters as bookshelves.

pinterest (original source seems to be lost)

This would be a very economical route and it looks cute to boot! It doesn’t even look like rain gutters. But we would have to cut the shelves and do a lot of DIYing to put them up on the wall, along with spray painting them a nice white.

Option #2: Buy white RIBBA picture ledges from IKEA.

Sarah Jane Studios Blog

I loved this photo (above). The shelves look so clean and pretty. But we would have to shell out $15 per shelf… which isn’t really bad, considering that we wouldn’t need to do any painting or cutting whatsoever.

Option #3: Sew cute fabric into hanging book displays.

penny carnival

I really loved this idea – with a great fabric, this would be a really cute addition to any nursery. But all the supplies and work needed to make these things would add up and I wasn’t sure this would cost any less than the easy RIBBA picture ledge solution.

Option #4: Turn BEKVAM spice racks from IKEA into tiny bookshelves.

BLAH BLAH BLOG

Very, very cute! And cheap, too, at only $3.99 each. However, we would have to buy several of them, since they’re so tiny and we have loads of books. And we would also want to paint them white, so that would require us to purchase several cans of white spray paint. And primer…. and the time required to paint them all.

Can you guess what we went with?

Yep – we went the easy route with the RIBBA picture ledges! I’m hugely pregnant and he’s hugely tired of all the DIY projects we’ve been tackling, so it felt good to do something easy for once. Plus, we liked the modern look of the ledges AND they were reasonably priced since we wouldn’t have to buy paint or any other extras.

We taped everything off to determine whether we needed three or four shelves. We thought we could put up four shelves… see all the space available above the tapes:

Never mind the mess, please. I promise it’s clean now.

But when Nick put the shelves up, he didn’t measure too carefully (that’s okay, babe), so there wasn’t enough space at the top for a 4th shelf. We thought maybe we could put one near the floor, like so…

Not too bad… but we can just see the little kid attempting to climb the shelves. So it was a no go. I’m not sure what we’ll do with the fourth shelf. It’s currently hanging out in our game room, waiting for its fate.

Nick did a great job styling the bookshelves. No, I’m not sure what’s exactly in his mouth.

I love how it looks right now! I think it would be really great with four shelves (we still have a couple of books that need to find a place), but this will do for now. We might decide to move everything around later on and add that fourth shelf, but right now we’re calling it done.

However, that empty space to the left of the books isn’t done. We talked about putting up art or something, but we remembered that huge mirror that came with our dresser.

I think I like it!!

Then I saw Julie Bowen (of Modern Family)’s beautiful dining room at Honey & Fitz:

Honey & Fitz

Look at them mirrors – so beautiful, so unique! We already have some yellow paint from our dining room and lots of gray paint in our little paint collection, so I think this will be a great color combination for our huge mirror!

The only problem is figuring out how to hang it securely, since it’ll be right next to our daybed. I don’t think I will tackle this project until after Baby comes (40 weeks + 3 days now), so hopefully Nick’s dad, who is very handy and will be staying with us for three weeks with Baby Vita, can help us out in this area.

Is that cool with you, Dad Vita?

What about you, Baby Vita? If you’re even in there, that is. I’m beginning to think this is just a phantom pregnancy

P.S. Thank you all so, so much for your opinions and votes on the dresser handles! We agree with you all and we’ll stick with brass… and we’ll clean them up a little bit. Later.

DIY Window Treatment Ideas: Roller Shades

As you all already know, window treatments can be ridiculously expensive. We definitely splurged on our roman shades for our living and dining rooms… but since I love them SO much every time I look at them, they were worth every penny.

But I just don’t feel like spending that much on window treatments for every room in this house. After all, we need to eat. We also need cute outfits for Baby.

However, I can’t just leave the windows here empty for long. My mom complained about not having any privacy in the guest room the last time she visited, so I really want to cover it up before she comes to stay with us for two weeks when Baby gets here (I’m 37 weeks now, by the way!).

There’s also the window in our master bedroom that used to have no shades until I got tired of flashing the neighbors and we put back up the cat-destroyed plastic blinds. It’s still there, mocking me every morning. And there’s the window by the stairs that’s right next to the front door. And the laundry window. And the window in our master bathroom. And that tiny window in our game room. Compared to some other houses, this isn’t bad, but I want to cover them up all very soon and CHEAPLY.

Enter the roller shade. I’m really happy with them in our nursery with the addition of a orange ribbon design, so I think I might use roller shades for the rest of our windows as a temporary solution until Baby grows up and becomes a rich lawyer and gifts us expensive and custom window treatments.

But I don’t want plain roller shades. Plain roller shades are ugly. Here are some ideas I’ve gathered from the interwebs how to turn plain roller shades into works of art.

1. Paint a roller shade.

This is such a fun roller shade! Jenny (who is a bona fide genius) from The Green Notebook painted this roller shade with latex paint for a client’s nursery. You could just paint a roller shade one solid, bright color if you prefer something simpler. Imagine a roller shade painted in pretty coral and paired with simple white curtains. Add a metal pull and you’ve got a sweet window treatment. Or go crazy with a chevron design – that would be very cool, too.

2. Use a stencil.

You see stencils everywhere in blogland on walls and ceilings, but what about on a roller shade? This tutorial from Southern Living seems pretty easy to follow and I would love to try this! Perhaps for that window near the stairs? I would do the stencil on both sides so it still looks pretty when you’re outside and trying to peer into my house. Stalker.

3. Cut out designs from the shade.

Isn’t this cool? Caution – the short tutorial for this project is actually written in some other language and translated into English, but the concept of this DIY is simple. You could even paint the shade and then cut out the designs that you want.

4. Cover it with fabric.

Blogger and designer Emily covered a roller shade with a nice striped fabric. She used fabric glue to do this project, but I think using a spray adhesive would result in a crisper job. If you do this, make sure that the fabric is thin and light enough so the shade can still roll up. Also, use a heavy-duty roller shade for this project.

5. Throw away the vinyl shade and DIY your own fabric shade.

If you’re handy with a sewing machine and have a heavy fabric that you just LOVE, forgo the vinyl shade and just remake the whole roller shade using your fabric and your mad skills.

My favorite out of all these is the stencil one. But they all are great, inexpensive solutions for naked windows. I might experiment with a couple of these soon. Which do you like the best?

The Office: Reality vs. Goals

Our office is not done yet, but it has come a long way since the last time we showed you our progress! Since the room isn’t even close to being finished, I’ll show you photos of what it looks like right now and discuss our goals for each space.

Current Reality: My Workspace

FYI: The teal on the walls is a lot more teal-ish with more green in it than what is shown in these photos. The light is from IKEA and we recently painted the ceiling a light gray (hard to see here), much better than the ugly builder white that was there before.

Goals for this space:

  • I need to start working on the yellow office chair very soon – we just finally found a good place for our sewing machine, so I’ll set that up and get started re-teaching myself to sew before tackling the office chair.
  • See that blank wall on the right side? I want to use two of our frames and put a cork board in them and cover them with fabric. (Similar to what Amber did for her craft room) I’m not sure whether we’ll go with a fun patterned fabric or use a simple cloth and paint gold stripes on them like in this photo from Lonny:

  • The L glass desk. I’ve had this glass desk (bought from Office Max, I think) since my college days. Blah. Someday, when our garage is cleared out a bit more, we’ll find a wooden desk on Craig’s List (hopefully free! so many free desks are posted on there every day) with lots of storage. It won’t be a L shape, so we’ll have more space for…
  • A little cute sofa/daybed that pulls out into a bed for guests. It’ll be under the bulletin board. I really like this one from CB2, but we’ll see.

Current Reality: The Back Wall

Argh, I’m still struggling to take photos when the sun shines through the window. This room gets really bright during the day, so I’m grateful to these cute birch tree curtains from IKEA that filters out a lot of the light. Perhaps I should try taking photos in the early morning…? Whatever, I’ll try again later.

See our honeymoon map hanging proudly? It’ll be moved down just a tad bit to make room for our cute yellow clock. Not much else to do in this space, except…

Goals for this space:

  • Finding a rug that goes well with the curtains, but that brings in color. I think a gray/white/black rug would be easy, but I want more color. I’m considering this rug, in citron from West Elm.

  • And of course, the shelves on the right need a lot of organizing and binders and etc. We’ll get on that soon… I’m even thinking about spray-painting our mismatched binders WHITE. Dumb or genius? Not sure yet.

Current Reality: The Closet Bookshelves

The shelves are up! But still not done yet. Sigh… We had to stop our progress this summer to load it all up so we could clear up space for our baby shower. Now we need to unload this again and continue work… But we’re focusing on the nursery for now, so this will have to wait. Again.

Goals for this space:

  • Obviously, finish all the shelves. We’re done with the front shelves, now we need to work on the side (on the right) shelves. We will need to add brackets as well.
  • Buy trim and attach it to the front of the shelves to make it pretty.
  • Lots and lots and lots and lots and lots of touch-ups!
  • I want a cute, cool light in there. Right now, all that’s there is a big bulb.
  • I know it will be GREAT once it’s done! Just can’t wait…

Current Reality: The Left Wall

The art is from Hobby Lobby and… that’s it. Oh, and do you like how we left the smoke alarm hanging? Very cool. We put the screws in a ziplock bag when we painted the ceiling recently and put it in a safe place. Too safe of a place, obviously, since we can’t find that darned ziplock bag.

Goals for this space:

  • There’s not much to do, since it’s our “walk-through” space. But I want to do something to jazz up that art. I want to add a little yellow in there. I’m thinking about painting the twigs yellow or adding a yellow mat, or SOMETHING.
  • And maybe something above the door. I love how Kim and Scott of Yellow Brick House puts art right above their doors, like so:

Current Reality: A Few Close-ups Just Because

These are photos of my favorite spots in the office.

The owl was picked up by my brother and his wife in Bolivia and the vintage Art book was grabbed (for free!) from the school library. I love the book because its bright and happy and reminds me of my mom.

See the magnets? We made them a long time ago with the caps of one of our favorite beers, Stella Artois. Ah, beer… Cold beer on a hot day… One month-ish left!

I love this little thing that we got from Z Gallerie and use as a pen/pencil holder. Although I do have to say that we need to get prettier pens/pencils…

And my constant companion while I work:

She’s cute, but not when she’s walking right in front of the laptop and begging for neck scratches. Lady, I’m working here!

Speaking of work, I’d better get my butt back up there and earn my keep.