Before and After: Laundry Room Cabinets

The saga of the laundry cabinets is a long one. Luckily for you, I won’t discuss it now. I will go into all the details next week.

For today, I present you some instant gratification! A simple before and after.

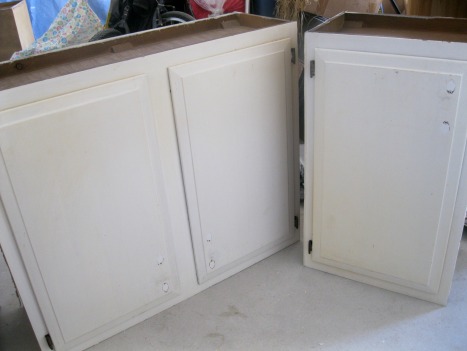
This is what the cabinets looked like when we bought them from a Habitat For Humanity Restore.

Peeling old cream paint, filthy both inside and outside, and many dings and other defects all over that required wood putty. Lots and lots of woody putty.

This is the wall in the laundry room that waited SO long for the cabinets.

IMG_2370

I can’t find a true before photo that shows you the inefficient shelf and clothes hanger rod that were there before, but this is the best I could find. The shelf was too shallow, so towels kept on falling off and a little cat kept on making the situation even worse.

And today, it looks like this!

IMG_3192

Never mind the stuff on the machines. Focus on the cabinets. And the pretty knobs! The knobs are from Hobby Lobby.

IMG_3184

The cabinets make me so happy. It’s been a long time coming, but it’s all worth it.

I’ll discuss later about the other things that we’re working on in that room and what things we want to change (the ceiling light, for one).

But for now… let me bask in the cabinets. You are done, cabinets. D-O-N-E.

Birds in the Sky… or the ceiling, whatever.

Just because it’s been quiet around here doesn’t mean we’ve not been busy! We are making good progress on the laundry cabinets and that thing is ALMOST DONE after so many touch-ups and additions and adjustments. I hope to show you what they look like by Thursday!

For now, I wanted to show you a sweet addition to the nursery that was made by my mom. Here’s the first clue:

IMG_2582

Yes, she’s looking up with a puzzled expression.

It’s a bird mobile!

IMG_2585

My mom did everything, from sewing the birds to gluing on the eyes to cutting down the branches (bought from Hobby Lobby) and hanging it all up on the mobile. Since she did everything, this is not a tutorial but more like a “Look, how cute! And I didn’t even have to do anything except hang it up!” thing.

IMG_2586

The colors she chose are perfect – bright blue/teal, yellow, orange, with touches of black and white.

IMG_2592

Janella is in love.

IMG_2588

She stares at the mobile when she lies down in her crib and tries to grab the birds when we hold her too close to it.

IMG_2599

Yes, a bird is missing a branch. The cats did it. Tala is my number one suspect.

IMG_2607

Since our goal for 2012 is to make the house FUNCTIONAL, it’s okay that the nursery isn’t 100% done even though Janella is almost 9 months old (how did that happen?). This nursery is definitely functional. It’s a happy place for all of us. Janella sleeps like a… well, a baby in there.

But I do have some things I want to finish up in there after we complete our laundry room and office to-do lists. For one, we bought three large canvases for that wall behind the crib and Nick is planning to paint a world map on them. I can’t wait for that!

See you Thursday for the laundry cabinets reveal, right? It’s a date, right?

New Ceiling Light: High Enough For Our Tallest Friend

Last week, something really horrible happened. A hit-and-run accident resulted in one of our good friends’ untimely death. Mark Gobble, a Ph.D. student about to complete his dissertation, a newly hired professor at Boston University, an owner of a skateboarding company, a family man, and probably the coolest guy we’ve ever met, died last Sunday. Needless to say, it’s been a tough time.. and even tougher for his wife and two children. You can read more about him in this blog post written by his niece, Brooke.

The world feels different without him, but the world still spins. It still moves around the sun. Janella still wakes up every morning at 6:30 AM with angry demands for milk. And so we must go on.

Mark was really tall – he was around 6’4. Nick’s 5’8 and I’m 5’4 (both rounded up numbers). When Mark came over in October to bring a meal from him and his wife to help feed me and Nick when we just had Janella, we had a conversation about new ceiling lights and how we needed one for our living room, which had a boob light at the time.

We told him that he was our tallest friend in Austin (we have another 6’4 friend who lives in New Mexico.. Hey, Jesse!) and asked him how tall he was… so we could make decisions on ceiling lights and how high they should be in order to accompany him. Since he was taller than everyone else, we could be confident that the ceiling light would also be high enough for every other friend we have.

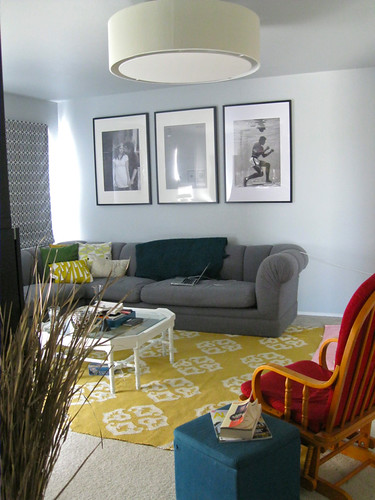
Well, Mark – we finally installed our new ceiling light in our living room. It looks beautiful… and it’s 6’8 off the ground. Definitely tall enough for you.

Thanks for bringing us to Austin. Thanks for your humor, your intelligence, your grace, your generosity, and for being our friend. We’ll never find a cooler friend than you… or a taller one.

FYI – The photos are NOT styled at all. We’re still missing one side table and we still need to set up our newly sprayed teal lamps with new lampshades. And I didn’t feel like putting away the baby toys. Ignore all of that. Focus on the ceiling light.

IMG_2484

IMG_2485

IMG_2487

To see what our living room really looks like when it’s not cluttered, check out this post.

The ceiling light is HUGE. I mean, H-U-G-E. Gigantic. It’s around 34 inches across. And we love it. It’s perfect. Especially when this was our inspiration photo, from Decor Demon:

I was afraid that it would make our ceiling feel lower, but it doesn’t! I’m really happy with it.

One thing down, only 327,121 more things to do left! PROGRESS.

My DIY Painting on Plywood

Once the gesso on the plywood dried, I was ready to start painting!

But first, I needed to look at some inspiration. I opened my pinterest “art inspiration” board and just looked through it.

art inspiration pinterest

I also grabbed a thank you card that we recently received and set it in front of me, because when we got the card we really loved the colors on it.

IMG_1943

Then I rummaged through our paint stash. We have a nice collection of paint – some leftover paint from our walls, our furniture painting projects, and many paint samples. I looked for different colors that were similar to the thank-you card.

And then I just… put brush to plywood and started painting.

painting, first draft, on plywood

This was the first stage of the painting. It was okay, not too bad. I didn’t really like the green — it was a little dreary and I wanted something cheerier, but that was all that I had.

Actually, the way the paint flowed on the plywood… it was all dreary. It looked like things were going downhill… like something was melting.

Then I stared at it some more and flipped it around.

upside down painting on plywood

Much better!

Maybe you don’t see much of a difference, but it just made me feel good about where things were going and I stopped for the day. I knew it wasn’t done, but I wasn’t sure what to do next.

The next day, I took the painting out again and looked at it.

And looked at the thank-you card again.

I felt that it needed something more, a bright color. Oh, orange – I had some left over from the orange closet. So I grabbed that and at the same time, saw glossy black paint and glossy white paint. Hmm, why not.

First, I added some orange and black… and it immediately looked better. I also laid the orange paint on as thick as I could to add even more texture.

adding black and orange to plywood painting

And then I added some white… and I was done!

completed painting on plywood

Wanna see the progression of the painting in photos that are horribly lit? Here you go!

progression of painting

Here’s a close-up so you can see the texture. For future paintings, I definitely want to experiment some more with texture using gesso using different materials.

texture of painting on plywood

I was done but the paint looked dull. The black and white paint, which were gloss paint, looked shiny but the rest, which were mostly in satin or flat, looked… well, flat. I asked my artist mom and she suggested me to use varnish. I found two different kinds of varnish spray at Michael’s – one for oil and acrylic paints and one for general purpose arts and crafts. Since I didn’t use acrylic but latex paint, I decided to use the general purpose one.

varnish general purpose

It worked great – the paint perked up and it’s all shiny and nice now!

Where did we put it? In this weird corner that rests between the living room, the dining room, and the mini-hall that leads to the bathroom and guest bedroom:

plywood painting on wall

I know, bad photo. It’s dark in this corner. I would love to someday add a light at the top of the wall, but we’ll see.

We’ve been talking about putting up a couple of art/frames here to jazz up the corner and to make the thermostat less noticeable. So far, we’ve put up a simple white clock (which has done wonders since we didn’t have any other way to tell time while at the first floor ever since we gave up our DVR) and this painting.

I want to do another plywood painting but this time with very thick and textured gesso and in a tiny size and maybe one color to put right above the thermostat to fill up that space. I also want to find a cute little ottoman to put at the bottom of the wall with a little box underneath to hold all the kitty toys. The cardboard box that’s there right now just won’t do.

Anyway – back to the painting. How did I hang it up? Easy…

using a tab from a can to hang up painting

I hung it up using a tab that I pried off one of our Ginger Ale cans that we save in the refrigerator for sick days. I found this great tutorial and this confirmation by Apartment Therapy that it worked, so I tried it and let me tell you… IT WORKS! It’s very nifty.

I think I’m going to save all the tabs from now on… it’s too bad we don’t drink soda when we’re not sick. Maybe we should start buying canned beer instead of beer in glass bottles…

My verdict: Plywood works great if you already have some lying around. If you want to buy some just for the sole purpose of making paintings, try to get hollow plywood if you can find them so they’re lighter. In small sizes, like my painting here, their weight is just fine. I mean, if a tab from a can can hold it up, it’s not that heavy.

One DIY painting down, 321 DIY paintings to do. I’ve got plans…

Janella’s First Tooth!

Come on, Janella, let’s show these nice people your first tooth!

janella

Open your pretty mouth, dear…

janella

No, no, don’t bite my finger. Open wider!

janella

Your tongue is very cute, yes, but not what we’re looking for.

janella

There we are!

Now you can go back to chewing on Sophie.

That was last week. As of today, she’s the proud owner of two teeth! Geez!

What’s next… will she be begging me to use makeup next week?

December, you came and went in a blink…

Something new, something old, and something blue…

They’re here!!


Our new washer and dryer are here! Beautiful, front-loading, WHITE machines. Love them. Washing clothes has become fun again! (I wonder how long that’ll last…)

We got them on sale, almost 50% off, thanks to Black Friday. American consumerism, I wuv you.

Our washer broke unexpectedly, so we had to get these new machines. And we sold our dryer on Craig’s List for $40. It was noisy and old. We’ll put that $40 to use in the laundry room.

With the new washer and dryer, our plans had to be tweaked a little. I measured everything out and also measured our cabinets. Since our three cabinets are in three different sizes, I had to think about how to arrange them.

One cabinet is 36 inches long with two doors, one cabinet is 18 inches long with one door, and one cabinet is 24 inches long but only 21 inches tall (the other two are 30 inches tall). So I played with all of the possible arrangements (see the drawings along the right side of the paper).

Originally, I had planned to push the washer and the dryer apart on two sides so there would be space in between for our cat litter. But when I looked at the possible cabinet arrangements, it made more sense to have the empty space on the left side.

Then Nick came up with a great solution for the cat litter (more on that later… want to see if it works out before sharing it with you all), so I changed our plans. We’ll put a small shelving unit there to hold our dirty towels and sheets. Something like this, maybe.

You can see what cabinet arrangement I picked by the very obvious circle. I think it makes the most sense and the door and knob arrangement is the most pleasing to the eye… at least, to Elisa’s eye.

We have plentyyy of space next to the machines, so the next step is to either find an unit to fit in there or make one ourselves. We’ll see…..

Right now, I’m working on sanding away the drippy paint from the cabinets. I’m relieved that I don’t need to buy paint stripper – the sanding seems to be working. I’m not worried about sanding away ALL the paint – just the bumpy parts.

Whoa – how’d that picture of Janella get in here?

Two of the cabinets are sanded down and smooth and ready.

OK, I’d better go and sand down the last cabinet. And prime. And paint. And put them up on the wall. And buy the knobs. I’ll probably only enjoy the knob buying part.

Janella – Week By Week!

We loved this idea of weekly photos with a different background every time, so we did the same but with a twist: we wanted to make sure that every background was meaningful and told a small part of Janella’s story.

She’ll be 7 weeks old tomorrow (WHAT?!), so here are the six photos we’ve taken so far… (Well, we actually took like 3,231 photos, but who’s counting?)

Week One

Background: Hospital blanket that she came home in.

Week Two

Background: Towel that dried her up after her first bath (what a disaster that first bath was…)

Week Three

Background: A darling knitted blanket from Janella’s great grandpa.

Week Four

Background: A purple fur blanket that’s on our bed. We’re co-sleeping… for now.

Week Five

Background: The curtains in Janella’s nursery.

Week Six

Background: The orange shag rug in Janella’s nursery… which was also my very first rug purchase from when I lived in my very first apartment.

That tutu is actually sized for 12 months, so it’ll be fun to see her grow into it. That blue bat is something we bought at Pecan Festival, which is a popular festival in Austin. And if you know Austin, you know why we got a stuffed bat instead of, say, a stuffed teddy bear.

I spent an inordinate amount of time last night looking through all the photos I had of Janella on my laptop. She was born only seven weeks ago? And she looked like that? She was that tiny? Amazing.

Janella Ali Vita is finally here!

10 – 18 – 11

1:55 PM

7 pounds, 15 ounces

More details to come on Monday by Wednesday!

Tutorial: How To Add Ribbon to Roller Shades

Okay, so let’s talk about how I put the orange ribbon on our cheap blackout vinyl shades.
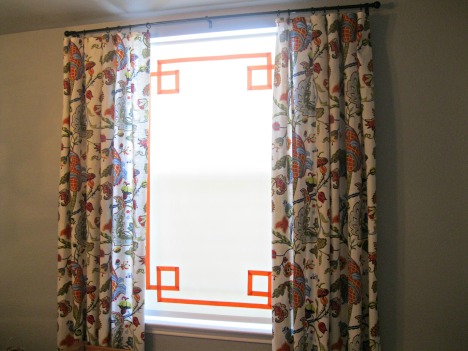
Yes, I promise these are room darkening shades. It might not look like it in the pictures, but they do help darken the room significantly (not completely, though) even when the Texas sun is shining at its brightest.

When left plain, the roller shades were boring and kind of yucky. The orange ribbon does wonders in brightening them up and giving them a purpose for life other than keeping a baby asleep.
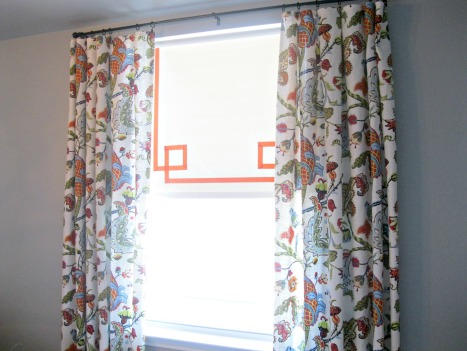
It all started when I searched through Pinterest for inspiration for adding ribbons to roller shades. I knew I wanted to go that direction after I saw what Janell did with the roller shades in her daughter’s room. But I just couldn’t find metal pulls for roller shades ANYWHERE on the internet. The only store I could find was completely sold out in pulls.

That’s why I was thrilled when I saw this photo on Pinterest:
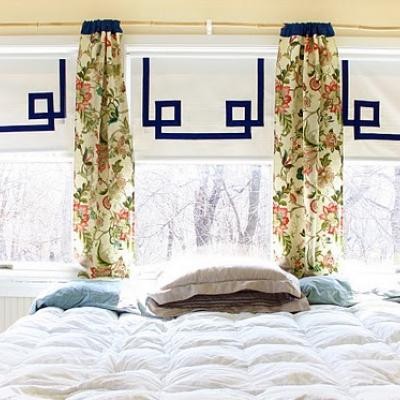
And I became even more excited when I clicked over and found this awesome tutorial. Kathleen shot a video of her working on her roller shades and even included a handy template for the squares at the corners. Let me tell you, that template definitely was needed by someone like me who fudges measurements on a regular basis! I changed some of the measurements, though, because my ribbon was thinner than hers and I wanted smaller squares.

Her video was so helpful in showing me how to fold over the corners just so that they looked great. Even though her video has no captions or a transcript for deafies like me, I was able to follow her process. If you’re looking to make something like this, I highly recommend you to watch her video first!

She used hot glue to attach the ribbon to her shades. I didn’t want to use hot glue because I don’t have hot glue and I have slightly traumatic memories of how messy and hot they are from my high school years (long story, but basically my class sold crafts for our fundraisers).

I thought I would just do exactly what she did, but with fabric glue.

First, I pulled the shade completely down while still on the window and made marks so I knew how much of the shade I had to work on. The full length of the shade is much longer than my window, but that’s fine. (Note: you can get roller shades cut down to fit the length of your window for free at Lowe’s.)

I had to keep my cats out of the room or they would attack the ribbon. Tala, however, did not understand that a closed door meant no playtime.

I started to work on the ribbons, but thought I would first test out using the fabric glue to attach a short length of ribbon on a piece of paper. I wanted to make sure that the glue wouldn’t bleed through the fabric.

I am so happy I did the test, because the glue did indeed show through!
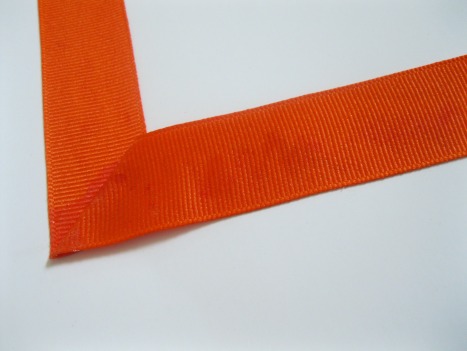
It looked messy and yucky, so I knew that I couldn’t attach the ribbons on the shade the way Kathleen did (if you didn’t watch her video, she measured everything out on the shade and then hot glued the ribbon right on top of the shade, folding and twisting the ribbon as she went).

I stared at the shade and the ribbon for a long while, wondering what to do next. Should I just suck it up and buy a glue gun? But my ribbon is orange and thus lighter than Kathleen’s dark navy blue ribbon. Maybe the hot glue would still bleed through my ribbon?

Hey… what about Heat n Bond?
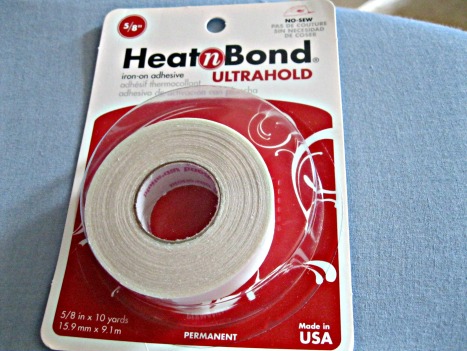
I experimented with folding down the corners using tiny triangular cut-outs of the Heat n Bond.

And what do you know – it worked! It required a bit of ironing and folding and cutting, but it wasn’t too bad. I would recommend that you add the Heat n Bond on both sides of the corners, so there’s no flapping around and it’s all nice and tight.
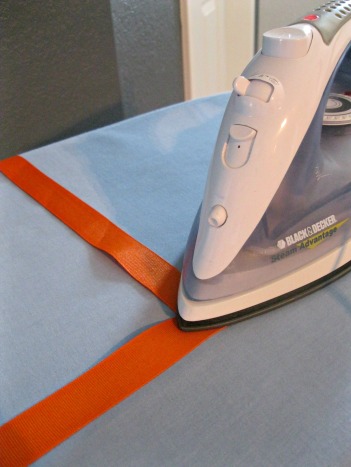
Another important tool that helped me with handling the ribbon was this magic in a bottle!

The heavy starch really firmed up the ribbon so it was easier to handle. If you’re doing this project, you MUST use heavy starch.

Progress was being made.

I did two corners and then just laid the ribbon out on the shade to make sure everything was looking good. It was.

I then decided to iron some Heat n Bond on the cross-over part on the corners just to make the ribbon a little easier to handle and to make sure everything was nice and straight.

Finally, all four of the corners were done!

Then my next dilemma was… how the heck do I attach the ribbon to the roller shades?!

I had some cut up roller shade vinyl material (from when we got them cut at Lowe’s) so I decided to experiment with it. First, I thought maybe ironing on Heat n Bond would do the trick. But the hot iron just melted the vinyl! I kind of expected that.

Maybe I really needed hot glue… but I was stubborn and besides I didn’t have the car that day (we only have one car and Nick had it for work that day). I decided to squirt out the fabric glue on a plate and use a brush to apply the glue on the fabric.

No bleed-through! Whew.

Gluing the ribbon on the shades was the easiest part. I just had to measure everything out on the shade to make sure that everything was straight and centered. Fabric glue doesn’t dry very fast, so I had plenty of time to brush all the glue on and move it around until it looked just right.

I thought and thought about the tiny window and whether I should do the squares too or just keep it simple…
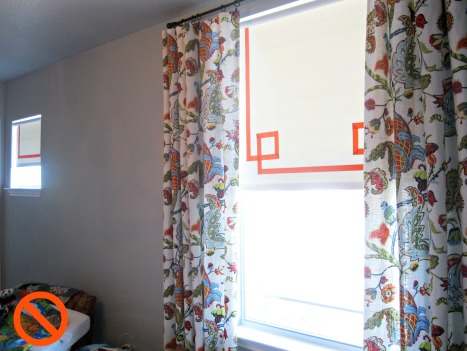
Obviously, I kept it simple. Looking at it now, I kind of wish I did the squares too, but then I might still be working on it right this second… so I’m glad I went the simple route and it’s all finished now!

One final thing – when the sun shines through, you kind of can see the folded corners:

I think it’s because of the light color of the ribbon. If you were to do this project, I would probably recommend a darker color, like black or navy blue or even red. But it doesn’t bother me all that much.

In all, it was a fun project and it was CHEAP! The roller shade was around $10, the ribbon (I had to buy two) cost me around $2.50 each, the glue was, what, a few bucks, the heavy starch… another couple of bucks. I already had the Heat n Bond but that would be just a few dollars, too. After doing some advanced math, I think we spent around $20 on this shade.

I had everything left over as well for the second window.. and the tiny roller shade cost us around $7. So that’s $27 for two roller shades. Not bad at all!

Next project for the nursery… the dresser! We’re Nick’s almost done working on it! I can’t wait to show it to you.

Linking up for the Window Treatment Challenge at the CSI Project…