Finding a Place for Mother Goose, Dr. Seuss, and Their Friends

We love books and we know our baby will love to read as much as we do. That’s why we asked our guests at our baby showers to bring a book along with a gift, so we’re off to a great start with piles and piles of books!

I cannnnnot wait to watch Nick read to our baby. (heart melts)

But how to store these books?

After searching Pinterest and blogs for ideas, I had several options:

Option #1: Use rain gutters as bookshelves.

pinterest (original source seems to be lost)

This would be a very economical route and it looks cute to boot! It doesn’t even look like rain gutters. But we would have to cut the shelves and do a lot of DIYing to put them up on the wall, along with spray painting them a nice white.

Option #2: Buy white RIBBA picture ledges from IKEA.

Sarah Jane Studios Blog

I loved this photo (above). The shelves look so clean and pretty. But we would have to shell out $15 per shelf… which isn’t really bad, considering that we wouldn’t need to do any painting or cutting whatsoever.

Option #3: Sew cute fabric into hanging book displays.

penny carnival

I really loved this idea – with a great fabric, this would be a really cute addition to any nursery. But all the supplies and work needed to make these things would add up and I wasn’t sure this would cost any less than the easy RIBBA picture ledge solution.

Option #4: Turn BEKVAM spice racks from IKEA into tiny bookshelves.

BLAH BLAH BLOG

Very, very cute! And cheap, too, at only $3.99 each. However, we would have to buy several of them, since they’re so tiny and we have loads of books. And we would also want to paint them white, so that would require us to purchase several cans of white spray paint. And primer…. and the time required to paint them all.

Can you guess what we went with?

Yep – we went the easy route with the RIBBA picture ledges! I’m hugely pregnant and he’s hugely tired of all the DIY projects we’ve been tackling, so it felt good to do something easy for once. Plus, we liked the modern look of the ledges AND they were reasonably priced since we wouldn’t have to buy paint or any other extras.

We taped everything off to determine whether we needed three or four shelves. We thought we could put up four shelves… see all the space available above the tapes:

Never mind the mess, please. I promise it’s clean now.

But when Nick put the shelves up, he didn’t measure too carefully (that’s okay, babe), so there wasn’t enough space at the top for a 4th shelf. We thought maybe we could put one near the floor, like so…

Not too bad… but we can just see the little kid attempting to climb the shelves. So it was a no go. I’m not sure what we’ll do with the fourth shelf. It’s currently hanging out in our game room, waiting for its fate.

Nick did a great job styling the bookshelves. No, I’m not sure what’s exactly in his mouth.

I love how it looks right now! I think it would be really great with four shelves (we still have a couple of books that need to find a place), but this will do for now. We might decide to move everything around later on and add that fourth shelf, but right now we’re calling it done.

However, that empty space to the left of the books isn’t done. We talked about putting up art or something, but we remembered that huge mirror that came with our dresser.

I think I like it!!

Then I saw Julie Bowen (of Modern Family)’s beautiful dining room at Honey & Fitz:

Honey & Fitz

Look at them mirrors – so beautiful, so unique! We already have some yellow paint from our dining room and lots of gray paint in our little paint collection, so I think this will be a great color combination for our huge mirror!

The only problem is figuring out how to hang it securely, since it’ll be right next to our daybed. I don’t think I will tackle this project until after Baby comes (40 weeks + 3 days now), so hopefully Nick’s dad, who is very handy and will be staying with us for three weeks with Baby Vita, can help us out in this area.

Is that cool with you, Dad Vita?

What about you, Baby Vita? If you’re even in there, that is. I’m beginning to think this is just a phantom pregnancy

P.S. Thank you all so, so much for your opinions and votes on the dresser handles! We agree with you all and we’ll stick with brass… and we’ll clean them up a little bit. Later.

Silver or Brass? Opinions Needed!

A quick post – I need your opinion! Here’s a small peek of our painted dresser for the nursery, but I can’t decide…

Should we leave the hardware brass or turn them into silver?? I have Rub ‘n’ Buff in silver all ready to go, patiently waiting for me to make up my mind. Nick has no opinion. What’s yours?

(The color is more teal-ish than what is shown here. Silly camera!)

DIY Window Treatment Ideas: Roller Shades

As you all already know, window treatments can be ridiculously expensive. We definitely splurged on our roman shades for our living and dining rooms… but since I love them SO much every time I look at them, they were worth every penny.

But I just don’t feel like spending that much on window treatments for every room in this house. After all, we need to eat. We also need cute outfits for Baby.

However, I can’t just leave the windows here empty for long. My mom complained about not having any privacy in the guest room the last time she visited, so I really want to cover it up before she comes to stay with us for two weeks when Baby gets here (I’m 37 weeks now, by the way!).

There’s also the window in our master bedroom that used to have no shades until I got tired of flashing the neighbors and we put back up the cat-destroyed plastic blinds. It’s still there, mocking me every morning. And there’s the window by the stairs that’s right next to the front door. And the laundry window. And the window in our master bathroom. And that tiny window in our game room. Compared to some other houses, this isn’t bad, but I want to cover them up all very soon and CHEAPLY.

Enter the roller shade. I’m really happy with them in our nursery with the addition of a orange ribbon design, so I think I might use roller shades for the rest of our windows as a temporary solution until Baby grows up and becomes a rich lawyer and gifts us expensive and custom window treatments.

But I don’t want plain roller shades. Plain roller shades are ugly. Here are some ideas I’ve gathered from the interwebs how to turn plain roller shades into works of art.

1. Paint a roller shade.

This is such a fun roller shade! Jenny (who is a bona fide genius) from The Green Notebook painted this roller shade with latex paint for a client’s nursery. You could just paint a roller shade one solid, bright color if you prefer something simpler. Imagine a roller shade painted in pretty coral and paired with simple white curtains. Add a metal pull and you’ve got a sweet window treatment. Or go crazy with a chevron design – that would be very cool, too.

2. Use a stencil.

You see stencils everywhere in blogland on walls and ceilings, but what about on a roller shade? This tutorial from Southern Living seems pretty easy to follow and I would love to try this! Perhaps for that window near the stairs? I would do the stencil on both sides so it still looks pretty when you’re outside and trying to peer into my house. Stalker.

3. Cut out designs from the shade.

Isn’t this cool? Caution – the short tutorial for this project is actually written in some other language and translated into English, but the concept of this DIY is simple. You could even paint the shade and then cut out the designs that you want.

4. Cover it with fabric.

Blogger and designer Emily covered a roller shade with a nice striped fabric. She used fabric glue to do this project, but I think using a spray adhesive would result in a crisper job. If you do this, make sure that the fabric is thin and light enough so the shade can still roll up. Also, use a heavy-duty roller shade for this project.

5. Throw away the vinyl shade and DIY your own fabric shade.

If you’re handy with a sewing machine and have a heavy fabric that you just LOVE, forgo the vinyl shade and just remake the whole roller shade using your fabric and your mad skills.

My favorite out of all these is the stencil one. But they all are great, inexpensive solutions for naked windows. I might experiment with a couple of these soon. Which do you like the best?

Laundry Room Progress: The Saga of How We Finally Found Our Paint Color

A few weeks months ago, we were picking out paint samples for another room and decided to grab a paint sample of Martha Stewart’s Lagoon (I think – or Sunken Pool) to test it out in the laundry room.

Reminded us too much like Scrubs.. both the TV show and the scrubs that doctors wear.

See?

So we just held off on that room while we focused on the guest bedroom, the Very Green Bathroom, and the nursery. Until we realized that we only had two rooms left to paint – our master bathroom and the laundry room – and we already bought the paint for the bathroom. It was time to get serious.

I researched, whined, played around with Photoshop, and discussed our ideas. Then I got an email from West Elm about their ben paint colors that they’re selling. I decided to go to their website and really liked these two paint colors:

Mt. St Anne

Wales Gray

Great! One of them is gonna be the perfect color! I asked Nick to get the samples at our local Benjamin Moore on his way home from work. When he brought the two tiny sample pots home, I was so excited to try them out… until he showed me the paint chips of the paint colors.

Shades of gray? Well “wales gray” should have been a dead giveaway but….! Remember, we definitely don’t want gray in that room because our cabinets will be gray and we have enough gray rooms in this house. I sighed and painted the samples on wall..

Yep, too gray. They are pretty, yes, but just too gray-ish.

Back to the drawing board. I checked out Pinterest, hoping to find some inspiration photos of light blue laundry rooms and hopefully find the paint colors in the sources. We found two images that we liked (but couldn’t find the paint colors).

via Pinterest (source seems to be lost?)

via Little Green Notebook

We printed these images and jetted off to Home Depot to hopefully find some close matches.

Our top choices were these:

Armed with our paint chips, we were ready to walk out of the paint section until I spotted a huge yellow sign saying “Oops Paint!”

“Hey, Nick – look at that. Maybe we’ll find something!”

“Eww.”

And he just walked out. Luckily for the stubborn Taurus streak that has been ingrained in me since birth, I ignored him and checked out the paint selection. Most of the paint cans were pints or quarts, but there was one gallon of paint hanging out. I peered at the top to see what color it was…

Hmm. This could work.

Finally, Nick walked back to me. I showed him what I found. He didn’t say anything, but I knew he was impressed. The sign said that Oops paint costs $7 for a gallon and I thought that was a GREAT deal.

But then Nick picked up the bucket and found the price.

And the paint color suddenly looked perfect and beautiful to us. Plus, it was cheaper than a sample and we had nothing to lose. Yesssss…..

We eagerly tested it out on the wall.

It’s the bottom one… and it looked GREAT! Not even close to gray at all and not too strong. Of course, the photo doesn’t show the color very well – it has more green in it than what it looks here.

You can see the color better in one of the paint chips that we had grabbed – it’s a VERY close match. Iconic Sky, Behr – our color is a little darker, but it’s close.

All for that only to find a gallon of Oops paint for $2.00? I think it was worth it.

Moral of the story: Always check the Oops section. And ignore your husband (or wife) when he says “eww” without looking.

The Adventures of the St. Lucia Map

During the week of March 1st to 9th, 2009, we were enjoying our honeymoon at St. Lucia, an island in the Caribbean. In fact, it was so beautiful over there, beautiful enough that we had to purchase something that would remind us of that island.

After searching around for a good while, we decided to get this beautiful map of St. Lucia poster.

We were really excited about it, and we did not want to accidentally bend it somehow, so on the way back to U.S., we carried it with us instead of stuffing it in packed luggage. When we arrived in Austin, we went off the plane and decided to check to make sure that we did not forget something. We DID forgot one thing! This poster of the St. Lucia map! It was laying under the seats that we were sitting on.

We semi-panicked and went back to the plane, and, of course, the flight attendants wouldn’t allow us to re-enter to get it. We begged for them to go back and check it out, and we hoped that they would find it. Even though our flight was one of the last flights arriving at the airport (all of the flight attendants were all ready to go home), one of the attendants decided to give it a try for us and she found it. What a relief!

Anyway, the poster was just laying around for a good two years because we couldn’t find a good frame for it. It has an unique size that requires a custom frame. After two years of semi-searching (and I really mean semi-searching, not serious searching), we decided that IKEA’s white RIBBA frame would be a great match. We just put the poster over the mat so it would fit. Problem solved!

Now, since we got those items together, we are currently struggling to find a good place for it in our house. The Office with the teal? Game Room with the dark gray? Upstairs Bathroom with the (soon-to-be) green?

I think that the office would be a great match. However, it will look exciting in the game room. The bathroom is just a throw-in to make other two look better with this frame.

Help us out! 🙂

– Nick

Sectional Sofa Dreams Answered by Craig

Know what? Nick is now addicted to Craig’s List and does MORE searching than me! How did that happen?? He’s even more successful than me… and I love it!

He found this sweet sectional sofa for $200!


This sofa is great – it’s comfortable, it’s pretty, and did I say it was only $200?

I enjoy the chevron pattern on it. I’ve been meaning to bring in some chevron in this house, but Nick did it for me. Awesome.

What’s more, the sofa is Drexel – solid, solid construction and will last a long time.

The sofa isn’t perfect, though:

I plan to add some trim to the sofa to cover up the imperfections. I checked out M & J Trimmings and here are our four top choices:

1, 2, 3, 4.

Now that I’ve gotten the trim search out of my system, I’ll probably just wait until we’ve got the rug and the art and the pillows in place before deciding on the trim. My mom suggested nail heads, which could be another cool option. Do you know of other stores where we can check out more trim choices at reasonable prices?

Just for fun, I considered a fringe trim for a hot second:

Wouldn’t this trim be so much fun? I remember seeing a great sofa with a crazy fringe in a magazine or online a little while ago – do you remember?? If so, please tell me where I can find it! I wouldn’t really put a fringe on this sofa, but it’s fun to think about.

Sometimes a solution presents a new problem…

We’re very happy with our nightstands, but… Remember these lamps?

Well, they barely fit the tops of the nightstands. If we add shades, they would not fit at all. Sigh… For now, we’ve relocated them to the living room where they will work for now. Still sans heads, but let’s focus on one problem at a time, shall we?

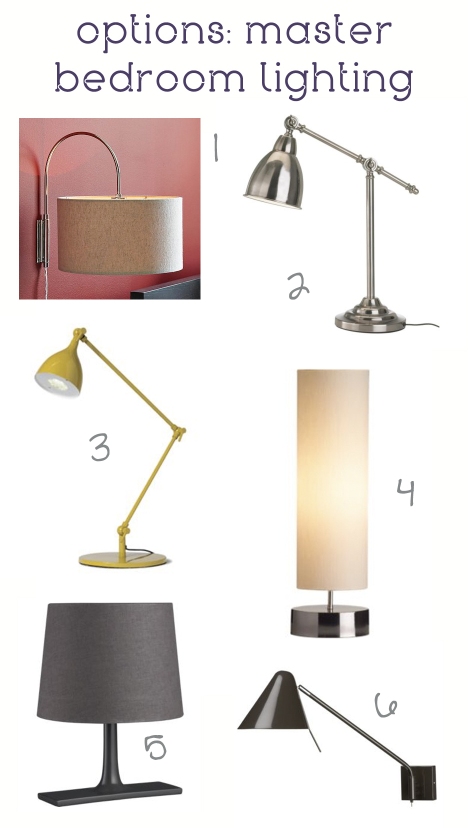
I’m thinking maybe sconces would work? Or metal industrial desk lamps? Some options we’re considering:


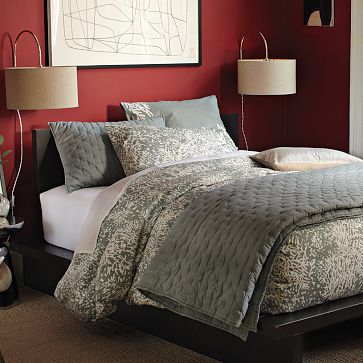
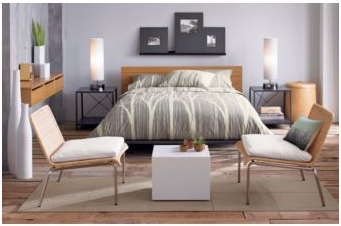
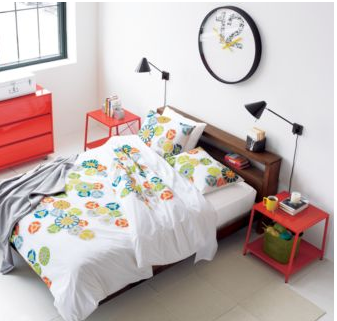
1 is from West Elm. I really like the idea of these sconces, but the color of the shades isn’t right. 2 is a desk lamp from IKEA. It’s simple enough… 3 is a cool yellow desk lamp from CB2 that I originally wanted for our office until I found a thrift little lamp instead. It could add a fun splash of color to our currently gray and black bedroom. 4 is a tall lamp from CB2 that I think I really like. You have to see it in a room (check out their website) to appreciate how tall and big it is. 5 is another lamp from CB2 with a really tiny base. The shade might be a bit too dark, though. 6 is yet another lighting option from CB2, but a sconce this time. This one looks really cool in a room on their website, too.

Ah, let me just show you the catalog rooms that showcase the lights 1, 4, and 6.

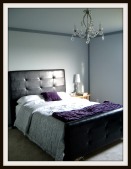
And you’ve seen our bedroom. So… which option do you think would be the best fit? Or do you have other suggestions in mind? The lamps can’t be more than 10 inches in diameter (actually, ten would be kind of pushing it), including the shade.

It’s interesting that Nick isn’t convinced at all on the scone thing, even after I showed him 385,407 photos with bedrooms with sconces, mostly from the Lonny archives. Some of his choice words when I showed him the photos:

“Grandma.”

“Huh?”

“That’s okay.”

(silence… gives me the Look)

I guess sconces in the bedroom don’t really appeal to men?

An Ode to Stripes & Flowers (& a sonnet)

Stripes and flowers, what an ultimate match

Masculine and feminine, hand in hand

The strip says to the floret, what a catch

Your beauty I just can’t bear to withstand

Lines upon lines of white space and color

Will dance off nicely against fresh flowers,

Colorful blossoms seem proud and taller

Next to stripes; you could stare at it for hours

Combine Anthropologie and J. Crew,

Mix sweet with savory, soft with sharp,

A marriage of beauty you can’t undo

If you oppose, you can jump off a scarp.

Stripes and flowers, you truly blow my mind

If Nick vetoes this, he’s patently blind.

sources: inspiration photo from lonny; some fun belowduvet, rug; unexpected eleganceduvet, rug; not too feminineduvet, sheets, rug; powerful colorduvet, pillow; soft but strikingduvet, pillow; yellow, jazzed upduvet, sheets; queen of the hiveduvet, pillow; black + flowers = yesduvet, rug.

Bathroom lighting: ideas, choices, and indecision

Now that I’ve bought the mirror and the whale art, and the rug, shower curtain, and knobs are on their way to my house, the next thing on my mind for our bathroom revamp is… well if you’ve read the title, you already know. Lighting.

Our current lights:

This is actually from our master bathroom, but you get the idea. Gorgeous, it is not. Our first floor bathroom is just like this, but with three bulbs.

I would LOVE to put in scones…

via lonnymag.com

…or a ceiling light…

…but I don’t feel like calling an electrician just yet, so we’ll stick with a wall light.

I like the clean look of the lights in this photo:

via The Estate of Things

Some options we’re considering:

via Lights Fantastic

via Lights Fantastic


via Lights Fantastic

All of these come in two lights or three lights. I’m not sure which we should go for, two or three? What do you think?

Just for funsies, here’s another animated GIF to see it all in action.

I’m still not sure… Do you have any better ideas for bathroom lighting?

All lights are from Lights Fantastic –  because there’s a store in Austin and there’s a great coupon that I plan to print out and use, if we buy from them. Find the coupon here, if you’re near Austin or Dallas!

Black & White Rugs

Our beige and ratty and cheap and cat-destroyed carpet does not look good next to to our new roman shades. Since we can’t get wood flooring right this second, I’m on the lookout for a great rug.

I started my search with black and white rugs. Neutral, striking, and (insert adjective here), they would look good with a white coffee table.

First up – the ubiquitous striped rug from IKEA:

Yes, you’ve seen this everywhere in blogland. And for good reason. It’s great-looking and at a great price.

Here’s one, that’s similar to the IKEA rug, but simpler…

…and more expensive. Still, I like it.

A while back, Raina from If the Lampshade Fits blogged about this, as she would say, delicious cowhide rug:

Unfortunately, it’s sold out, but I emailed them a while back asking if they could do it in gray and black and they said they could do it in any color. So, maybe they would be willing to make another one if I email them again?

Another rug with a diamond pattern, from West Elm:

Nice. It’s a casual look, very comfy and cozy.

A bit refined version of the diamond pattern rug can be found at Dash and Albert:

I think I like this version a little better. The white is more white.

Not done with diamonds yet, dear Reader. This one’s from Overstock:

Well, it’s more like a hexagon pattern.

What about this one, also from Overstock?

It looked sooo beautiful in Laura’s shed. I never knew a shed could be beautiful.

This one is sassy. Not sure if it would work in my living room but maybe yours?

And this one, just for fun, because apparently plaids are in.

It could be really cute in the right room. I think?

Should I tone it down on the patterns due to the window shades… and add a touch of yellow to our rug, because we want to bring in more yellow to relate with our dining room accent wall? Something like this:

Maybe I should look into yellow rugs…….. Later.

For now, here’s an animated GIF to visualize all this! My first animated GIF… ever. It seems like you have to click it to see it in action. (Not all of the above rugs are in this GIF)

Looks like a rug with a strong pattern won’t work. This took time to make, but much cheaper than buying the wrong rug! I do like the last rug, though.