Laundry Cabinets: Covering Up Gaps and Installing Molding

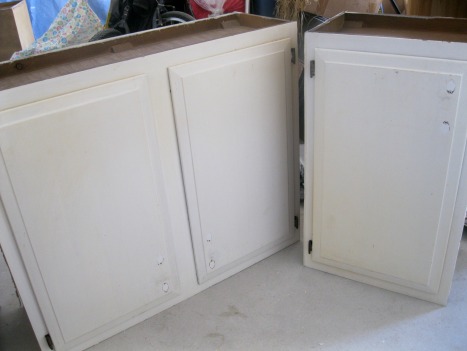
After we installed our laundry cabinets, we were left with two gaps – a huge one on the left and a sloped small gap on the top.
IMG_2689

Here’s how we covered up these gaps.

We cut a piece of wood to fit in the gap between the wall and the cabinet and painted it gray. So much painting. My painting clothes are covered with Web Gray. I’m so sick of Web Gray at this point.

Nick’s parents flew back to Pennsylvania and we were left behind to finish up the project on our own.

Nick pushed up the wood piece into the gap. We originally thought we would glue the wood piece to the cabinet, but the fit was so tight that we figured glue wasn’t necessary.

IMG_2691

Nick used a piece of wood to hammer on to make the wood piece flush with the cabinets. If he had hammered straight on the cabinets, we would be left with unsightly marks.

IMG_2692

All flush and ready to be screwed in!

IMG_2695

Yes, there’s still a gap at the top, but we’ll get to that later.

A note – our cabinets are solid, solid wood… VERY solid. Thus, we had to pre-drill all new holes. Here, Nick’s pre-drilling the hole where the screw will go in.

IMG_2710

Janella woke up from her nap so she joined into the action. But she apparently was still tired… She was reaching for the drill bits and yawned just as I took this photo!

IMG_2712

So cute. I look forward to having her hang out with us with her toy tools when we’re working on DIY projects in the future. So fun!

The last step was to put in molding (or moulding, which is the UK spelling that’s used in Northern U.S. Since we’re in Texas, I’ll spell it molding. Yes, I googled it).

Here’s a dumb and low-quality photo (thanks, Photobooth) of me holding up a primed but not yet painted piece of molding to show you its shape.

Photo on 2012-06-26 at 22.44 #2

We cut the corner edges using a saw and a plastic miter box. You don’t need a huge miter saw for this simple project. But that doesn’t mean I want one as a gift in the future (hint, hint).

IMG_2723

See how the molding covers up the gap perfectly?

IMG_2724

Next up was putting in the finishing nails. We were scared to do this part… and I really wished that we had a nail gun. In the end, I do think a nail gun would have been MUCH EASIER and efficient and would have given us a prettier result.

Nail gun, another possible gift in the future, cool? We could have rented a nail gun but this was such a small job that it wasn’t worth the price of rental.

We got this small hammer and a box of 1-1/2″ finishing nails. Some tutorials out there say to get 2-inch nails, but this worked just fine for us.

IMG_2725

The hammer, however, didn’t work so well. We quickly abandoned it in favor of a regular ol’ hammer. The process DID put some dings in our ceiling, but that was easily covered up with minimal drywall putty and touch-up paint.

We used this thing.. a nail set, I think it’s called… to drive in the nails some more to sink it lower than the molding.

IMG_3093

It worked okay. The thing is, our cabinets are SOOO solid that we actually had to pre-drill the holes before hammering in the finishing nails. Ugh. Another reason I really wish we had a nail gun. Newer cabinets might be easier to hammer in than the ones we have.

Then we filled in the holes with wall putty… because I just DIDN’T FEEL LIKE priming the holes, which I would have to do if I used wood putty. But it doesn’t look perfect. So… I will go back and cover them up again with wood putty, prime, and paint sometime later in the future. When I detox from all the painting I did. But this is a BIG IF because you really can’t see anything unless you look at the nail holes closely.

After lots of touching up on the ceiling, the walls, and the cabinets with lots of weird body bendings on my part…

IMG_3182

WE ARE DONE!

IMG_3184

The only thing I’m not sure about is the piece of wood that we added on the left. Should I caulk the space between the wood and the cabinet to make it look like one piece? Or would it look funny in the end?

Nick says we should just leave it, but I’m not so sure. I’ll decide later.

So happy that part’s done. We tossed our towels and stuff in these cabinets and it’s amazing how much these cabinets can hold!

There are even plenty of space left and we’re still planning on adding more storage solutions to the room. We do have lots of things, such as toilet paper and paint buckets, hanging out in random places around the house that I would love to transfer to the laundry room.

The laundry room is far from done, but the cabinets were a HUGE piece of puzzle and the room is now FUNCTIONAL. So happy.

What about you? Would you have done some things differently? We’re still new to all of this, so if you have any tips for molding or covering up gaps or installing cabinets, share them in the comments!

Refinishing Old Cabinets

The saga of the laundry cabinets is so long, I’m dividing it up into three parts.

Today, we’ll talk about how I refinished the cabinets. On Wednesday, we’ll discuss how we installed the cabinets. Finally, on Friday, I’ll show you how we covered up all the gaps and finished it off with molding.

Here we go!

This is what we started with.

IMG_2419

The cabinets had dirty white paint that was sloppily applied.

IMG_2422

Paint spilled over the edges and the brush strokes were obvious.

IMG_2424

I took my detail sander and sanded off the paint drippings on the edges. I wish I had an orbital sander, which would have been a much more efficient tool.

IMG_2427

I thought I would sand off all the paint, but it was too thick and it kept on clumping up the sandpaper. So, I just focused on the edges and smoothing up the brush marks as best as I could.

In the next photo, you can see what the edges looked like before I sanded them on the left side of the sander, and the sanded down edges on the right side.

IMG_2433

After a LOT of sanding and going through several sheets of sandpaper, I was finally done! Well, eh. Done with the first step, at least.

IMG_2436

You can see how all the sand built up in the edges of the cabinets. I vacuumed them out with a vacuum (I need to buy a shopvac soon) and cleaned them up as best as I could.

Unfortunately, the cabinets STILL weren’t ready for paint. There was thousands of holes and dings that I had to fill up with wood filler. This was almost as fun as doing my taxes. No, doing my taxes was SO MUCH MORE fun than filling up all these tiny holes.

The next time I buy used cabinets, I will be sure to check for tiny holes. If there are too many of them, I will pass on them because of how long this step took me in the refinishing process!

But again, all that work and time was worth it because in the end, the cabinets were (mostly) smooth and looked like new.

IMG_0177

To reach that point, I used oil primer (two coats) and two to three coats of Behr paint color-matched to Sherwin Williams Web Gray. I used a foam roller and a high-quality brush.

IMG_3184

Come back on Wednesday to see how we installed the cabinets!

Before and After: Laundry Room Cabinets

The saga of the laundry cabinets is a long one. Luckily for you, I won’t discuss it now. I will go into all the details next week.

For today, I present you some instant gratification! A simple before and after.

This is what the cabinets looked like when we bought them from a Habitat For Humanity Restore.

Peeling old cream paint, filthy both inside and outside, and many dings and other defects all over that required wood putty. Lots and lots of woody putty.

This is the wall in the laundry room that waited SO long for the cabinets.

IMG_2370

I can’t find a true before photo that shows you the inefficient shelf and clothes hanger rod that were there before, but this is the best I could find. The shelf was too shallow, so towels kept on falling off and a little cat kept on making the situation even worse.

And today, it looks like this!

IMG_3192

Never mind the stuff on the machines. Focus on the cabinets. And the pretty knobs! The knobs are from Hobby Lobby.

IMG_3184

The cabinets make me so happy. It’s been a long time coming, but it’s all worth it.

I’ll discuss later about the other things that we’re working on in that room and what things we want to change (the ceiling light, for one).

But for now… let me bask in the cabinets. You are done, cabinets. D-O-N-E.

The Story of the Headless Teal Lamp

Remember my spray paint mania? Well, it’s still going strong.

I ended the last post with this photo as a hint…

lamp in living room

I thought it was really obvious but nobody guessed it correctly!

I’ve had these headless lamps for a long time now…

They are beautiful and a smoky purple color. I bought them for our master bedroom, but the side tables we got later on were too small for these lamps.

So they were just hanging out in our office, doing nothing.

We had nowhere to put them. I thought they would work in our living room, but they added absolutely nothing to the room. The room needed more COLOR other than yellow and the lamps just didn’t do the job.

We looked for a great pair of teal or blue lamps, but couldn’t really find anything we liked or in our price range.

And so… you know what’s coming.

glass vase waiting to be spray painted

Yep, I decided to experiment on one of the lamps and spray painted it the same teal I used on The Thinker!

At first, it felt crazy to be spraying such nice lamps. But they were lamps we had no use for. And they were pretty inexpensive — we got them from Target. Instead of buying another pair, why not just use what we have?

Tape off the top and the cord. Prime it. And then… TEAL SPRAY PAINT TIME.

use blocks to keep lamp from falling over

I carefully covered the lamp with several layers of thin coats. I wanted it to be perfect. Near the end of all that layering, I needed to spray the bottom of it, so I turned it over but it wouldn’t stop rolling over. I was paranoid that I would come back into the garage to find the lamp broken and crying after falling off the box.

I added two little wood scraps on both sides to keep it intact. The lamp didn’t fall off, so I guess it worked!

teal lamp

I can’t believe how grainy this photo is. It can get dark in the living room when all the shades are pulled down and most of the time, they are, because the houses next to us are too close for our liking. We will need to add frost to the windows to give us more privacy, and then I will keep them pulled up much more than I do now.

But anyway. Look at the teal lamp!

teal lamp

Remember, they’re teal, not blue like they seem to be in these photos. Cameras hate teal.

The teal lamp just works beautifully in the living room. It adds COLOR and LIFE – two things our living room needed. Now, with the addition of some colorful pillows and some more color touches here and there, it will all work together.

Okay, let’s talk about the lamp shade. In the photo above, it looks great and white. But in real life, it was kinda loose and flimsy and when the light was turned on, it looked sickly yellow.

The lamp shade is from Target as well and I was so excited to finally have heads for the headless lamps, but I hated them so back to the store they went. And I will never (never say never) buy a lamp from Target again, because it is so hard to find decent compatible lamp shades for them.

Here’s why:

kinds of lamp shade types

graphic from LAMPS USA

Most lamps require a spider/harp fitter shade, but Target lamps use slip UNO fitter shades. Then what happens? You tear your hair out when you can’t find a cute slip UNO fitter lamp shade for your stupid lamp.

I did some research to see if I could convert the slip UNO fitter lamp into a spider/harp fitter lamp. Behold.. this tiny apparatus.

Slip Uno Adapter Harp Converter Lamp Shade Uno Euro Fitter

It’s called a slip uno adapter. The amazon description explains it well:

“Slip Uno adapters are made to fit directly over a plastic lamp socket found on lamps usually purchased at places like IKEA. This adapter will then let a harp attached to it. Then it will allow you to use nearly any replacement shade on that lamp. This is meant to be an alternative to the lampshade which has fitter already attached to it. You can now easily attach a harp to a lamp without one.”

Cool, right? But it costs $10. Yes, $10 for that tiny thing. Plus $4.18 for shipping. Then I will also need to purchase a harp and then… the reason I’m doing all of this work… a lamp shade.

*EYE ROLL*

I did some more research and one website (HERE) calls the little circle thing a “saddle” and says it should be 50 cents. What? Really? That sounds slightly better.

I’m going to make some calls to local lamp shops and let you all know how it works out. If you have any tips, bring them my way! Otherwise… give me good vibes.

Closing off this with a cute little Instagrammed photo of the lamp! Yes, we finally got a iPhone and hell didn’t freeze over. As far as I know, at least!

teal lamp

Spray Paint Mania

Do you get spray paint mania? Right after you spray paint something and you remember how easy it is and you love the result, you go foraging around the house looking for things you can spray paint.

I’m in the middle of a manic episode right now. I’m even considering spray painting my dining table. Fortunately, there’s a wise guy here named Nick who will stop me from committing this madness.

But nothing is stopping me from spray painting things that don’t work in our house in their original state.

It all started with this little project:

the thinker and the cat, before

The Thinker and the Snobby Cat were both Home Goods finds. We grabbed The Thinker a long while back for the office and I planned to spray paint it white, because it was just too dark and we don’t need any more gray things in this house. The Snobby Cat is a recent find and it was too silver – the kind that looks cheap. It looks better in the photo than it did in real life.

My original plan: turn The Thinker into a white statue and paint the Snobby Cat a cool orange.

I gave both mini-statues a coat of primer. This step changed everything.

The Thinker just didn’t look good in white. It made him look fat… well, not really. He just had too many dents and dings and he looked weird. This photo shows this, but this was after the first coat of teal spray paint.

The Thinker doesn't look good in white

Sorry to ruin the surprise but we decided to make him go teal.

Also, the white primer on the Snobby Cat looked really good and I decided that he had to get a lighter color than orange. What about a bright yellow?

Snobby Cat turns yellow

He’s still snobby, but he looks better doing his snobby thing.

Here’s The Thinker in all of his teal glory.

The Thinker goes teal

Why does my camera curse me so? That’s not teal, that’s blue, camera!

Here’s the same photo, edited heavily to show you the real teal color that it looks like in real life.

This, but only darker.

Well, this is a really simple project (spray paint projects always are) but let me tell you something that I learned…

Rust-oleum spray paint is the best.

rust-oleum spray paint is the best

It coats BEAUTIFULLY… Just be sure to shake the can constantly as you spray. It costs slightly more, but it’s worth it. It’ll be the only spray paint I’ll use from now on – if the color is right. I just wish they had more colors!

The Thinker was sprayed with Rust-oleum Satin Lagoon and Snobby Cat was sprayed with Rust-oleum Gloss Protective Enamel in yellow. Both great, bright, saturated colors.

The pair is now happy in their new home – the Expedit in our game room.

The Thinker and Snobby Cat in their Expedit Home

The nice thing about creating a home with a good color flow is that these things can be put in any room and still look good. So, even though they look good in the expedit right now, they might make a move sometime in the future.

Remember what I said about my current manic episode? Well… guess what I’m working on right now. Here’s a hint:

In other news – I hope you had a great Easter weekend!! We spent ours at the park and it was perfect. Mounting Bloggif

Pretty Painted Vases, Part 2

I should probably explain my absence for the past three weeks.

Janella learned how to flip to her stomach and that resulted in days and days and days and days and days of sleep deprivation on my part, but now she is 100% happy sleeping on her stomach and I am 95% okay with it. Maybe 85%.

So. Where was I?

Ah, yes. The painted vase project.

painted vase fail

The good news? The paint was easy to remove.

peeling off the paint glass vase

After peeling off the huge globs of paint, I was able to remove the rest with a damp paper towel.

So you can see that the tape on the vase didn’t work out… but in some parts the tape really did work. You can see some crisp lines here and there. I think that tape COULD work if you had a lot of space (e.g. a bigger vase) to maneuver and press the tape on the glass harder than I was able to.

Once the vase was free of the paint, I just poured in some new paint and followed all of my tips. I tell you, I give great tips. The painting of this vase went beautifully and it dried much faster than the other vases did.

pretty blue vase

(Ugh blurry photo) Boring, maybe? But still pretty!

Since I still had several more vases looking forlorn, I tried another paint trick.

A few weeks ago we stopped by West Elm (aka Heaven on Earth) just to look around (and pick up a few cute things, of course) and I thought this vase was cute:

west elm vase paint stripeI told Nick, “Hey, what do you think of this? I could attempt this with one of our glass vases!!”

Nick chuckled to himself with one eyebrow raised and then gave me a little shrug and stuck out his bottom lip (the international facial expression for ‘maybe or whatever’) and walked away with Janella. The nerve…

I made this, and Nick loves it. Elisa for the win!

yellow stripe on vase

I just poured in a little of the paint – enough for it to slide down the side, but not too much that it’ll drip all over the place. But the paint was a little too thick so it moved way too slowly for impatient little me. And the stripe turned out to be triangle-y.

painting a yellow stripe on vase

I’m waiting for it to dry before doing the other side to reduce the likelihood of drips – and I will try thinning out the paint with a little water. That should work.

OK! Enough about vases! But wait. I want to bask in the glory of “I FINALLY DID IT AND IT LOOKS PRETTY” so look at this Expedit set up with my “new” vases.

expedit in game room

Can you spot all the painted vases? I also experimented with a painting technique from this tutorial (see the green vase on the right, second row) but it didn’t really make for a pretty result.

I enjoyed playing around with the styling of the expedit! It gave me a few minutes of relaxation in between Janella’s cries today. It’s still very visually cluttered, but it is so much better than what was there now. I “shopped” the whole house to try to fill out the expedit and now I know exactly what we need for it. We need some white things (see the closet light cover on the bottom right, ha) that pop, five baskets to line the bottom to fill games with and reduce visual clutter, and a few colorful frames here and there of our favorite people.

I’m also SLIGHTLY considering spray-painting some of the game boxes. That’s a little crazy, maybe?

Now you can go! And I promise I won’t disappear for three weeks again. Unless Janella learns how to stand on her head or something…

laughing janella

"HA HA! I have PLANS for you, mom! HAHAHA!"

Pretty (at least I think so) Painted Vases

This is a FREE and EASY project that I’ve been meaning to do for a long while. Years, actually. I have no idea why it took me this long, because it was really, really, really, really, really, really, really, really, really easy.

diy painted glass vases

I had a collection of glass vases left over from our wedding. They were used for our centerpieces.

When was our wedding? Three years ago. These vases languished in a storage box for THREE YEARS.

Four vases are now rescued and the rest are sadly left behind…for now.

The four vases that I chose for this project:

glass vasesglass vases

You probably should use enamel paint that’s designed for glass for this project, but I used latex paint from the 382 sample pots I have on hand. I’m not worried about painting peeling off because I don’t plan to put anything inside these vases. These will be purely for looks.

I have paint samples in many different colors, but I really liked this photo that I saw on Pinterest and wanted to keep all the vases in the same color family:

blue vases shelves

These vases will hang out in our Expedit in the game room once they’re good and dry.

painted glass vases

They look so much better painted! The one on the left is sporting a very light gray shade (it looks whiter in person) that we considered for our living room back in the day, but passed over. The middle one is proudly wearing a Scrub color, but it looks so much better on her than on our laundry room walls! The left one is also painted with another laundry room reject. It looks a little more teal-er in real life, not so gray.

Paint colors: Sherwin Williams’ Site White, Martha Living’s Araucana Teal, Benjamin Moore’s Mount Saint Anne.

For the vases with crazy shapes, I went with more subdued colors and had fun with bright colors for vases with more classic shapes. I think it’s a good strategy!

I wanted to experiment with tape on the 4th vase, so I grabbed some green tape and tried to tape a simple border just below the rim, but it didn’t work out. The tape was hard to apply since I was taping it inside the vase and it just wouldn’t go around in a neat band. So I just let the tape do its thing and the ends met up alright in the end.

glass vase taped up

Something different, I guess?

I decided to show you the progress while painting this vase. I didn’t use a paintbrush or anything fancy… I just let gravity do its magic. (Paint color: Sherwin Williams’ Calypso, briefly considered for our office and rejected because it was too bright)

pouring paint in vase

I protected the countertops with some foil – much more neat than paper towels.

rolling around paint in vase

This is the fun part.

And then the light flashed! You can see the light plugged in the outlet just behind the vase. That light is SO annoying… it flashes like a fire alarm. I hate it. But it lets me know when Janella is crying.

So I had to stop the… ah, see? The light just went off. Speak of the devil. Hold on.

OK, I’m back.

After attending to the little queen for around an hour and half…

janella has two teeth!

“Look, ma! Two teeth!”

I finished swirling around the paint only to find a few splotches:

splotches

This was caused by the paint drying before I could finish it. Luckily, it was easy to fix – I just wiped off the splotches and spread around the paint again and voila!

However, I don’t think the tape will work out…

tape leakage

It seems like it leaked through in some spots. Nick says the leaks will give it “character”. I think that’s a great way of looking at things. That giant scratch on the dining table? Character. That stain on the rug? Character. A spot in the carpet that has been scratched up and destroyed by a certain cat? Character. Baby spit-up on the sofa? Character!

blue vase with tape

Well, come back in a week to see how this project pans out. The paint isn’t dry yet. There’s actually a lot of paint at the bottom of all the vases and I’m waiting for them to dry… it might take a while. Cliffhanger!

A few tips:

– Do this project only if you already have some glass vases and sample paint pots laying around. If you’re going to buy supplies for this project, get enamel paint for glass and get glass vases for 50% off at Hobby Lobby, please. *EDIT* Go to the Dollar Store instead! $1 each, can’t beat that.

– Don’t get interrupted by a baby.

– Do all the swirling in the vase at once, before paint dries. Then pour out the excess paint immediately. I didn’t, so it’s taking forever for the paint to dry.

– Don’t use a paint brush (or your finger!) to spread around the paint – they can leave marks on the inside that will turn you off if you peek inside. Just swirl it and the paint will level out by itself and look SMOOTH and professional.

– Bold colors for simple shapes, calm colors for crazy shapes.

– Don’t use these vases for anything – no flowers, no rocks, no nothing. They’re just for looks.

Despite the mistakes I made and some imperfections here and there, I really love these vases. When they were just glass, I had no use for them… and now I can’t wait to really decorate the Expedit with these vases. And the other vases that I have will be painted in other colors for other spaces in the house. Fun, easy, and FREE!

If only all of our projects were like that…

I first got the idea when I saw this at Sugar and Charm through the magic of Pinterest.

Before and After: Janella’s First Dresser

This is definitely my favorite part of Janella’s nursery.

Why do cameras hate the color teal? The color never shows up right in photos. Our teal office looks blue in pictures, and the same goes for this dresser. I don’t know what the color of the dresser looks like on your monitor, but I’m looking at the above photo and it screams BLUE to me.

I heavily edited a photo to show you what the color really looks like in real life…

nursery teal dresser after 1

The teal color is very close to this:

teal bluevia

So – for the following pictures, just tell your eyes to stop lying to you and look at the dresser as if it’s teal, not blue. Got it? Good.

This project was all Nick’s doing… I was pregnant at the time, so he did all the work. I’m so happy I’m not pregnant anymore, I’m telling you. Not because I can paint now, but just because. Pregnancy = blah. But I will gladly do it again because… well, just look at her.

silly janella

Anyway.

It took several coats to get it to its final teal-ness. We tried out flat paint this time – all of our previous furniture painting was with satin paint. I’m not too sure I would recommend flat paint due to the amount of coats Nick had to do. But was that because of the flat paint or because the color is so saturated? Not sure.

The color is Behr’s Peacock Tail. After two coats of primer (which was white, not tinted, which might have also contributed to the need of several coats of teal paint?) and two coats of the teal paint, the dresser looked like this:

You could easily see all the brush marks and the color was uneven. But after two (or three?) more coats, the color finally looked right. Whew.

Nick, hard at work. Note the toilet paper on the sofa behind him. I had a cold at the time, OK? Also note how we taped off the edges with green tape. An important step – if we didn’t do that, the paint job would have looked sloppy on the drawers.

The painting wasn’t so bad, but the poly was a beast. Nick tried everything and we still could see streaks at the top from the poly. It’s not so noticeable anymore, but you can see the streaks in the next photo.

So annoying. I think we’ll go with wipe-on poly next time, or spray-on poly. But spray-on poly is sorta expensive and we’re sorta cheapstakes thrifty.

Then I couldn’t decide whether to keep the hardware brass or paint it silver, but after a vote on this and all of your helpful comments, we decided to keep it brass. But I’ll do some cleaning up to make them shine sometime later. Later. I love that word: LATER. I wanna try this nontoxic, homemade brass polish – it looks very nifty! Nifty, that’s another favorite word.

nursery teal dresser after

nursery teal dresser after

The dresser is the perfect size to hold all the STUFF that a baby requires. I’m really glad we didn’t go with a smaller dresser! Our changing pad also fits on the top of it perfectly, with space left over for other STUFF. What, I don’t know. I don’t have any experience with babies older than 3 months. I’m learning as I go here, people.

nursery teal dresser after

The nursery is nearing completion. What’s left:

– Finishing up the bird mobile that my mom made
– Creating a map canvas thingy to put on the wall behind the crib
– Washing our old orange shaggy rug
– Painting the daybed a glossy white
– Painting the mirror to be put up next to the bookshelves
– Painting the side table some color, to be decided later

Not too bad… I knew we wouldn’t finish the nursery in time for Janella’s arrival, but we made it functional before that big date and I’m glad we did! At least, hopefully we’ll finish it completely before Janella moves in there. When will that be, Janella? When? WHEN?

On Cloud Nine With Our Closet

Another piece of the nursery puzzle is done!

While I’m sad that Baby doesn’t want to come out yet, I’m happy to have the extra time to finish off the closet.

Later on, when Baby is up and about, we’ll know more about what we need in terms of storage solutions (maybe a tiny Expedit for toy storage, for example, or shelves for shoes), but for now it is cute and happy and done!

Here’s what the closet looked like before – a blank slate.

Since the closet is between the crib and the upholstered chair/pouf that we have in the nursery, the door was kind of annoying to open and close. Plus, our AC/heating system is kind of wonky and it would get really, really hot in there if the door was closed. So, the first thing we did was to remove the door.

And you remember my caulking and painting job. We also didn’t like how the brown rods looked, so we primed and painted them white.

Our dresser, originally intended for the guest room, fit in the closet better and provided us a way to organize extra stuff.

Look up and see our boring closet light. How exciting.

We discussed a couple of different color possibilities for the closet, but the only one that made sense was ORANGE, BABY. We tested out a couple of orange colors and settled on Amber Glow – it’s a soft orange and went well with the curtains. The other colors reminded us too much of the Longhorns and if you’ve ever been in Austin on a Saturday, you know we have too much of that rust-orange color prancing around.

After painting the ceiling gray, the walls orange, caulking and painting the shelves, and hanging up the leftover fabric from our curtains, we were done!

I’ve always loved the closet in Sherry and John of Young House Love’s sweet nursery and how they used the curtain as the door, so that was what we did here.

Unfortunately, the fabric that we had left over from the curtain project did not quite reach the floor. Instead of leaving it as is and thinking of flood pants every time I look at it, we simply gathered it to the side with a ribbon (from our ribbon shades) and hung it on a tiny hook. So cute!

The ribbon was easy to make – all I did was to iron-hem the ends and add velcro. Ta-da!

We also tried to reduce the “flood pants” look by lowering the curtain rod as much as we could without it looking funny.

We really struggled with how to hang the closet curtain. YHL hung theirs on a tension rod, but we weren’t sure we wanted to go that route because we didn’t feel that it would be very secure. We thought of many different possible solutions that were all mostly stupid, but we finally found this thin window rod at Wal-Mart that worked perfectly! I don’t know what it’s called (bad blogger), but you can find it at Wal-Mart for around $3.

Come in and peek inside. You’ll see another tiny roller with the royal ribbon treatment. I also think this photo represents the orange in the closet the best.

What’s inside the closet? Not much right now, but I’m sure it’ll fill up quickly. Diapers, tiny clothes, a breastfeeding cover, and a couple of other essentials.

I know, we don’t have much baby clothes. We actually do have more plain white onesies tucked away in the drawers – and a few very cute gender-specific outfits that I don’t want to show you yet. The gender is a secret!

I don’t want to buy too many clothes before I know what size Baby is. I hate wasting money.

I had a lot of fun personalizing some white onesies with paint, though! I’ll talk more about that in another post, but you can see a few of them here – the KISS and the Phillies onesies.

And yum, could you just eat up that white white whiteeee shelf and rod? And the caulking is perfect. Yes, I’m proud of myself. That was an extra step worth taking.

Okay, on the other side – the dresser and the world’s cutest humidifier in the shape of an excited baby elephant. That’s pretty much it – for now. The dresser is stocked with blankets, towels, PJs, socks, hats, and cloth diapers.

But my favorite part is when you look up!

Isn’t that just adorable? That’s the cloud light, as I call it. Actually, it’s the SKOJIG light from IKEA. It’s the perfect light for the closet – it’s almost flush to the ceiling, so it doesn’t interfere with the shelves, but it makes the closet a more special place.

A word of caution if you’re considering the SKOJIG light – it didn’t really fit our… ah, I need to develop my electricity/lighting vocabulary. I don’t know what any of these things are called. I hope the photo below is clear enough for what I’m trying to tell you about…

Basically, it didn’t fit, so we had to drill new holes to get it to fit. We’ve had problems with the other IKEA light we have (in our office), so this might be an IKEA thing (European measurements?) or just something weird about our home? We don’t have any problems with other ceiling lights. Do you have any problems installing IKEA ceiling lights?

Anyway, despite a few tantrums from an unnamed person (not me), we got it to fit. And we love it. Especially when the light is on and the clouds smile upon us…

So that’s our little orange closet for our little colorful nursery for our little baby.

Officially one week late today. Nick and I are always late to everything, so I guess this is just a taste of our own medicine. It doesn’t taste too good.

How to Caulk Without a Caulking Gun

Just call me MacGyver… or a cake decorator.

This post might be a little boring to you, but I’m so proud of my hard work that I just had to show you what I did. Plus, my little adventure here is a testament to how the little things that you do around the house can make you so happy, even though nobody else will notice what you did.

Let me introduce you to the closet of the nursery:

It’s a pretty roomy closet, so we’re fixing it up in order to maximize its space and… to make it pretty, of course. I’ll show you more of this closet later on when we make some more progress, but today I want to talk about caulk.

This house was brand-new when we bought it, but the builders did a BAD job with the caulking. I can’t believe how many cracks we can see in the caulk all over this house.

It’s ridiculous. Caulking isn’t rocket science. It’s not even freshman biology.

The nursery closet was full of gaps and ugly cracks due to a bad caulking job.

Ugly.

Unfinished.

Since this closet will be dedicated to our special baby, I wanted it to be perfect. I also didn’t want to fix the caulk later on after the painting and the decorating. So I decided to grin and bear it and caulk everything NOW.

Out came the caulking gun and the caulk tube that came with the house.

I put the caulk tube in the gun and squeezed. Squeezed. Squeezed some more. No caulk was coming out. I kept on squeezing and squeezing. There was a small pop… Weird.

Squeeze. Squeeze. Squeeze.

Until I came to the end of the caulking gun’s squeezing range. Did that make sense? I mean, I couldn’t squeeze any more. The caulking gun was all squeezed out. And there was no caulk coming out. Huh?

I pulled out the caulk tube and found this…

Oops. I broke it.

I think the caulk dried up at the top so all my squeezing was for naught and it just pushed through the bottom of the caulk tube. Good times.

I sighed and contemplated asking Nick to buy some more caulk on the way home from work.

I stared at the caulk tube.

The caulk was soft and plentiful. Wasted caulk, wasted money, wasted time.

I squinted my eyes… wait a minute. The caulk itself was still in good condition.

Now this is where the MacGyver (or cake decorator) part comes in. I grabbed a ziplock bag and put a few spoonfuls of caulk in it.

I cut off just a little bit at the tip and tested it out.

It was beautiful.

I hate hate hate hate using the caulking gun. It’s messy and it makes me all paranoid because the caulk won’t stop flowing, so I have to caulk with my heart beating fast and then quickly pull the handle on the gun to STOP THE MADNESS.

With this ziplock bag method, I could just caulk at my own pace. The bead of caulk was also tiny, so it was really easy to just wipe it down with my little finger. It felt nice. Relaxing, even.

I think I won’t ever use a caulk gun again.

Much better, right?

I caulked everything and gave the shelf and supports two coats of white paint to cover up the dingy white that was there before. Do apartments and buildings shop at the same paint store? Is the store called Dingy White Paint? Why can’t they use Ultra White? I will never understand their obsession with dingy white.

Better. Ahh. Never mind the white paint on the walls, we’ll paint over that.

Yes, much nicer.

The whole time I was doing this, I felt like I was channeling Benita from Chez Larsson – she does things like this all the time, doing the “little things” and making them all pretty and white.

So that was my caulking adventure!

I’ll tell you more about the closet very soon. I have to go and work on it right now, actually. I’m 38 weeks now and my hands are kind of swollen, so I’m thinking that maybe, just maybe, Baby will come soon. I gotta hustle, people!

A little glimpse at our progress: