Window Shades Finally Purchased. (We are now poor… but happy!)

Remember when I was locked out and I didn’t mind because I had gotten my fabric sample and I was excited about it and I thought that the fabric would be a good choice for our roman shades in our living/dining rooms?

Yeah, that fabric sample didn’t work out. The light gray color of the fabric blended too much with the light gray on our walls.

So we ordered some more fabric samples – one more from The Shade Store and five from Tonic Living.

This picture was taken at night, so the colors aren’t exact, but you get the general idea. Which fabric would you have chosen?

I liked all the fabrics, but most of them wouldn’t work for our roman shades – but maybe for pillows or even an ottoman. Maybe, maybe.

Our winner: This fabric.

It’s more expensive than the first fabric that I considered for our roman shades… but I think it is SO worth it! It is better than ANY other fabric we’ve seen during our search (and we’ve been searching forever… see this, this, and this! It’s been almost an year… Geesh).

It works well in our dining room, too!

The dark gray color is almost an exact match to our dark gray walls, and the white outlines play off our white mirror well. It is PERFECT.

We put in our order on Halloween (is that good or bad luck?) and hope to get them very soooooon. I am verrrry excited to put them in and see how they look! They are definitely a SPLURGE for us, but they will make us happy for the rest of our time living in this house. There was a roman shade sale at The Shade Store, which helped, along with free shipping.

Dilemma solved. Obsession ended. What’s next?

Mirror, mirror on the wall

I was wasting time on the internet when I came across this website and saw that it had a daily steal feature. Then I clicked on it and a cute mirror was being sold for only $35! At that time, we had just bought a mirror from TJ Maxx for our entryway but I wasn’t 100% satisfied with it. So I convinced Nick to buy it and waited for it to arrive at our house.

It arrived pretty promptly but when we opened it, I wasn’t all that thrilled. I mean, you get what you pay for, and it was just black and a bit blah. Here’s a picture (without the mirror glass) of the mirror and its side panels.

Then, around the same time we got it, I saw this picture via this blog:

[via]

I loved this set of mirrors! So pretty and against a gray wall. And it looked similar to our mirror. White. Hmm. White spray paint. I got to spraying and then we tried it on our entryway hall. But it didn’t look right – the mirror was a bit too small for the wall and our mirror from TJ Maxx filled out the space a bit better.

Hey, what about the dining room?

And we decided to hang it diamondly (new word for you) rather than squarely (not a new word but I’m using it differently here).

White spray paint is really magic in a bottle. This looks much better than before and it looks like it cost more than what we paid for it. I saw a mirror that was semi-similar to this and it cost $200. That kind of made my day.

The only problem? I also sprayed the side panels white and I’m not sure what to do with them.

Any ideas?

Linking up to…

New dining table, with a cat on top

Another great thing about Nick being a math teacher:

This giant compass.

[via]

Okay, okay, okay. I’m exaggerating (just a little bit). But his compass was pretty big. It helped us decide what size table to get for our dining room.

Behold:

42″ is definitely out. Too small.

What about 54″?

Looks about just right! But there’s plenty of space all around the table and chairs. Perhaps we could go a bit bigger?

Like 60″?

Wow, a 60″ table would fit in our dining table perfectly! (And that’s Nick comforting Tala after she fell a third time – she kept on jumping on the cardboard thinking that it was sturdy but nope there’s nothing underneath)

But a 60″ table would be expensive, maybe a bit too big for our tiny six chairs, and would mean we couldn’t add a bar cart or some kind of storage to the room.

We decided on 54″ but it all depended on whatever we could find. And we looked. Looked. Hard. And we decided to go ahead with the Sonoma dining table from Z Gallerie – it was the best table out there that was ALMOST black.

And we love it!

Love the contrast between the chairs and the table. Love the curvy base.

Love how big it is – all the better for me to spread out all of my students’ work to grade and plan for classes. And it’s big enough for Tala to join me and keep me company.

But sometimes Tala just plainly refuses to let me work.

Almost done in this room! What’s next? Window treatments and maybe a bar cart. Some accessories on the top of the table. Paint the ceiling. Later on, wood flooring.

Hmm. I guess I shouldn’t say “almost done” when I think about it. But…! Remember what this room looked like before?

Before:

Now:

Linking up to…

Visit thecsiproject.com

The White Chairs in Action

I’m alive. Our visit to Iowa for Thanksgiving was great but the drive to and from there wasn’t so nice. You can add that to our list of “Let’s Not Ever Do That Again”.

Just before we went on our road trip, I snapped a few pictures of our new chairs. Here’s one… along with a before picture because it’s more fun this way.

Before: builder chandelier, cheap IKEA dining set from my old apartment, unpainted walls, plastic white blinds, and a big ugly ghost orb.. no, wait, that’s from our camera.

After: Fancy chandelier, painted walls, new chair (and still the cheap table.. we’re working on a black round table…), and destroyed-by-cats blinds.

Before and afters like this help me smile and nod my head slightly with the knowledge that we ARE making progress on this house, no matter how sloooow it seems like on some days.

I’ve got quite a few things to share with you this week – a gift that I made for my sister-in-law, a cat eating a catalog, and progress on my jewerly drawer project…

Pretty Sweet (and White)

Yesterday was a fateful day.

Yesterday, I saw two blog posts. One showed this picture:

livingroom by jenloveskev.

from jenloveskev

And I fell in love. That dark gray walls! Same as our dining room. That dark table! That’s in our near future. And these white chairs! Not in our plans but plans are always changed!

AND then I saw this:

from younghouselove

That is it, white chairs is definitely in our future.

THEN – one of the commenters (thank you, Julie!) on Young House Love said that there was a sale at Target’s on similar white chairs.

*gasp*

Before we made the big commitment, we decided to do some research.

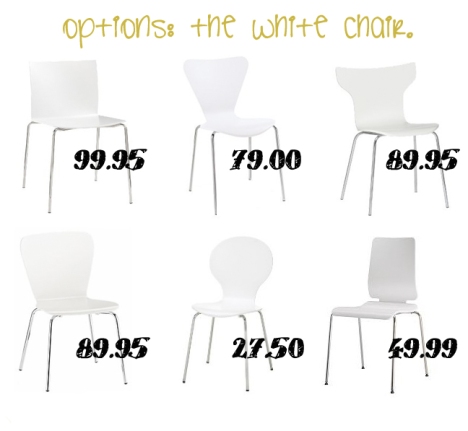
All pretty similar, right? Some slight differences, yes, but the overall feel is the same. Simple, modern, cool. Can you pick out the most expensive chair from the picture? What about the chair that’s priced the best?

Don’t cheat. Do not scroll down. Look at the picture above and make your choices.

Are you done?

Ok.

Let’s find out what the prices are…

Gasp. We zoomed to Target today and made the big purchase! Two chairs for $55! We got six chairs! You do the math! What a deal!

I can’t believe it. They need to be assembled, of course, but 27.50 per chair??? And they are pretty comfortable and cute!

If you need extra chairs, head over to Target. They have these chairs in espresso, green, and blue. And white, of course! They could be used as cute extra chairs for any room in your house. And who doesn’t need more chairs for Thanksgiving?

Where to find the white chairs pictured above? Clockwise from top left: CB2, Room and Board, CB2, IKEA, Target, Crate and Barrel. There’s also a similar white chair at West Elm.

Walk the Line

The paint job on our dining room is DONE… for now, sorta. Just a few touch-ups here and there, but pretty much DONE!

That light-gray wall in the dining room that we didn’t like? Now it’s dark gray!

However, we had to do a LOT of touch-ups because of the corners. Thanks to an experienced-male-who-won’t-be-named-because-I-don’t-think-he-is-proud-of-how-knowledgeable-he-is-about-home-decor, the corners weren’t very hard to do. But they took up quite some time. Whoever said a watched pot doesn’t boil should try watching paint dry.

If you live in a house with knock-down texture, this is a MUST. When painting stripes or corners of any kind between two different colors of paint, you need to do the following things:

1. Paint the first color on the wall and spilling past where you want the line to be. (In our case, we started with gold)

2. Put the tape on the wall.

3. Paint over the line with the same color paint (again, we painted the tape with gold).

corner

4. Let dry. Paint a second coat if necessary (we had to do this because the dark gray still stepped through after the first coat).

5. Paint over the line with your second color (for us, dark gray).

painting a corner

6. Second coat, if needed (unfortunately, it was needed for us).

7. Before the second coat dries, pull off the tape! You should have a near-perfect line.

gray gold dining room

Isn’t that satisfying? It was for me. Ahhhh. Some tiny, tiny touch-ups will be done with a tiny, tiny paintbrush (I aim for perfection) but for now, it looks great!

And now for everyone (mine, at least)’s favorite part – the before and after shots!

Before:

before dining room

After:

gold and gray dining room

Not that BIG of a difference but I think the dining room looks much more cohesive now. Plus, they kind of match our cats…

We’re stopping with this room for now. We need to buy a dining table before even thinking about making any other purchases or adding anything on the walls. And we promised ourselves that we wouldn’t buy a dining table until we get that 8,000 from Uncle Sam…. which we will use to pay off all our debt (expect the good debt) and then get wood flooring AND THEN A TABLE.

Check back in February-ish to see our purty dining table! (I have to get one by then because that month I am hosting Ladies’ Game Night. Eeps..)

Guess Who’s Coming to Dinner

We need a dining table, STAT.

54 inches. Black. Round. These are our only requirements.

(well, and it can’t cost three thousand. yes we saw a table for 3k and we said NO)

Our top contenders so far:

Click here to view larger image

Z Gallerie

Ballard Designs

We will go to a local Z Gallerie to check out the first table. It is not black, like we want, but it is a dark wood – so we will see how we like the color.

The Ballard Designs table is definitely black but we can’t check it out in person – they only have stores in Georgia and Florida. (That’s a hint, Dear Reader)

Come on! I want to find a table! I’ve been too embarrassed to invite people over because of that cheap ikea dining set from my old apt! (And yet I’ve had no qualms sharing pictures with the world on my blog… Weird.)

Coloring the Dining Room

We recently painted the wall between the kitchen and the dining room light gray (the same color as our living room). But lately, we’ve been looking at it and thinking that it just doesn’t look right.

paintingdiningroom

To give you a better idea of what the dining room walls look like right now, look at the picture below:

DSC02993

As you can see, there’s three different colors: dark gray, gold, and light gray. It looks a bit disjointed, maybe?

We can’t decide whether to leave it as it is… or paint it another color.

Should we paint it dark gray? It would continue the dark gray that’s on our arches and the left wall.

paintingdiningroom2

Or should we paint it gold? So when we’re sitting in the living room, we’ll see a gold background framed by dark gray arches.

paintdiningroom1

But look at our kitchen cabinets. They’re a goldish brown. Is that too much of a similarity? I really wish our cabinets were black.

Keep in mind, we plan to paint our kitchen the same light gray as in our living room. We might not stay with the color, but we want to at least have some color up in there for now (and it will be easier to clean the walls with paint than without).

HMMMMMMMMMMMMMMMMMMMMMMMMMMMM.

Lol at the spilled gold paint on the floor in the last picture. I’m such a master photoshopper.

Crooked No More!

We moved into the house with this UGLY chandelier.

DSC02987

Very crooked. Because Nick and his big head broke it.

DSC02993

So boring and blah. Now it is finally time for our new chandelier to break out of its box…

it's looking at us, waiting...

And be strewn all over the floor… And hopefully not eaten by Vaquero…

DSC03033

New Chandelier, meet your new home…

DSC03035

Nick introduces the Chandelier to the Hole…

DSC03042

Until Elisa cannot hold up the Chandelier anymore. So they switch…

DSC03048

Almost done.. Just gotta tuck in the wires…

DSC03050

Screw in the screws… And we’re done!!

DSC03051

So happy, so gleaming, so new!

DSC03055

We love how the light reflects off the ceiling – very dramatic!

Good night, old chandelier. You will rise again… But not with us…

DSC03037

Ahh, that’s done and over with. What’s next?

Many thanks to Mom Kathi who took pictures while we put up the chandelier. She spent the weekend with us for her birthday and it was a lot of fun! XOXO