Laundry Cabinets: Covering Up Gaps and Installing Molding

After we installed our laundry cabinets, we were left with two gaps – a huge one on the left and a sloped small gap on the top.
IMG_2689

Here’s how we covered up these gaps.

We cut a piece of wood to fit in the gap between the wall and the cabinet and painted it gray. So much painting. My painting clothes are covered with Web Gray. I’m so sick of Web Gray at this point.

Nick’s parents flew back to Pennsylvania and we were left behind to finish up the project on our own.

Nick pushed up the wood piece into the gap. We originally thought we would glue the wood piece to the cabinet, but the fit was so tight that we figured glue wasn’t necessary.

IMG_2691

Nick used a piece of wood to hammer on to make the wood piece flush with the cabinets. If he had hammered straight on the cabinets, we would be left with unsightly marks.

IMG_2692

All flush and ready to be screwed in!

IMG_2695

Yes, there’s still a gap at the top, but we’ll get to that later.

A note – our cabinets are solid, solid wood… VERY solid. Thus, we had to pre-drill all new holes. Here, Nick’s pre-drilling the hole where the screw will go in.

IMG_2710

Janella woke up from her nap so she joined into the action. But she apparently was still tired… She was reaching for the drill bits and yawned just as I took this photo!

IMG_2712

So cute. I look forward to having her hang out with us with her toy tools when we’re working on DIY projects in the future. So fun!

The last step was to put in molding (or moulding, which is the UK spelling that’s used in Northern U.S. Since we’re in Texas, I’ll spell it molding. Yes, I googled it).

Here’s a dumb and low-quality photo (thanks, Photobooth) of me holding up a primed but not yet painted piece of molding to show you its shape.

Photo on 2012-06-26 at 22.44 #2

We cut the corner edges using a saw and a plastic miter box. You don’t need a huge miter saw for this simple project. But that doesn’t mean I want one as a gift in the future (hint, hint).

IMG_2723

See how the molding covers up the gap perfectly?

IMG_2724

Next up was putting in the finishing nails. We were scared to do this part… and I really wished that we had a nail gun. In the end, I do think a nail gun would have been MUCH EASIER and efficient and would have given us a prettier result.

Nail gun, another possible gift in the future, cool? We could have rented a nail gun but this was such a small job that it wasn’t worth the price of rental.

We got this small hammer and a box of 1-1/2″ finishing nails. Some tutorials out there say to get 2-inch nails, but this worked just fine for us.

IMG_2725

The hammer, however, didn’t work so well. We quickly abandoned it in favor of a regular ol’ hammer. The process DID put some dings in our ceiling, but that was easily covered up with minimal drywall putty and touch-up paint.

We used this thing.. a nail set, I think it’s called… to drive in the nails some more to sink it lower than the molding.

IMG_3093

It worked okay. The thing is, our cabinets are SOOO solid that we actually had to pre-drill the holes before hammering in the finishing nails. Ugh. Another reason I really wish we had a nail gun. Newer cabinets might be easier to hammer in than the ones we have.

Then we filled in the holes with wall putty… because I just DIDN’T FEEL LIKE priming the holes, which I would have to do if I used wood putty. But it doesn’t look perfect. So… I will go back and cover them up again with wood putty, prime, and paint sometime later in the future. When I detox from all the painting I did. But this is a BIG IF because you really can’t see anything unless you look at the nail holes closely.

After lots of touching up on the ceiling, the walls, and the cabinets with lots of weird body bendings on my part…

IMG_3182

WE ARE DONE!

IMG_3184

The only thing I’m not sure about is the piece of wood that we added on the left. Should I caulk the space between the wood and the cabinet to make it look like one piece? Or would it look funny in the end?

Nick says we should just leave it, but I’m not so sure. I’ll decide later.

So happy that part’s done. We tossed our towels and stuff in these cabinets and it’s amazing how much these cabinets can hold!

There are even plenty of space left and we’re still planning on adding more storage solutions to the room. We do have lots of things, such as toilet paper and paint buckets, hanging out in random places around the house that I would love to transfer to the laundry room.

The laundry room is far from done, but the cabinets were a HUGE piece of puzzle and the room is now FUNCTIONAL. So happy.

What about you? Would you have done some things differently? We’re still new to all of this, so if you have any tips for molding or covering up gaps or installing cabinets, share them in the comments!

Before and After: Laundry Room Cabinets

The saga of the laundry cabinets is a long one. Luckily for you, I won’t discuss it now. I will go into all the details next week.

For today, I present you some instant gratification! A simple before and after.

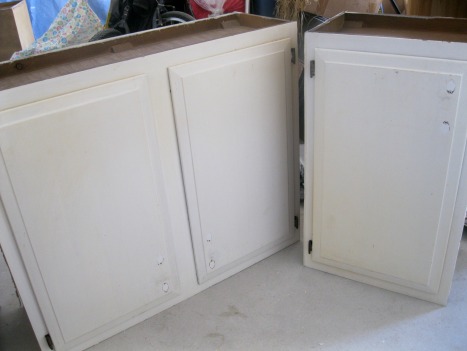
This is what the cabinets looked like when we bought them from a Habitat For Humanity Restore.

Peeling old cream paint, filthy both inside and outside, and many dings and other defects all over that required wood putty. Lots and lots of woody putty.

This is the wall in the laundry room that waited SO long for the cabinets.

IMG_2370

I can’t find a true before photo that shows you the inefficient shelf and clothes hanger rod that were there before, but this is the best I could find. The shelf was too shallow, so towels kept on falling off and a little cat kept on making the situation even worse.

And today, it looks like this!

IMG_3192

Never mind the stuff on the machines. Focus on the cabinets. And the pretty knobs! The knobs are from Hobby Lobby.

IMG_3184

The cabinets make me so happy. It’s been a long time coming, but it’s all worth it.

I’ll discuss later about the other things that we’re working on in that room and what things we want to change (the ceiling light, for one).

But for now… let me bask in the cabinets. You are done, cabinets. D-O-N-E.

The Story of the Headless Teal Lamp

Remember my spray paint mania? Well, it’s still going strong.

I ended the last post with this photo as a hint…

lamp in living room

I thought it was really obvious but nobody guessed it correctly!

I’ve had these headless lamps for a long time now…

They are beautiful and a smoky purple color. I bought them for our master bedroom, but the side tables we got later on were too small for these lamps.

So they were just hanging out in our office, doing nothing.

We had nowhere to put them. I thought they would work in our living room, but they added absolutely nothing to the room. The room needed more COLOR other than yellow and the lamps just didn’t do the job.

We looked for a great pair of teal or blue lamps, but couldn’t really find anything we liked or in our price range.

And so… you know what’s coming.

glass vase waiting to be spray painted

Yep, I decided to experiment on one of the lamps and spray painted it the same teal I used on The Thinker!

At first, it felt crazy to be spraying such nice lamps. But they were lamps we had no use for. And they were pretty inexpensive — we got them from Target. Instead of buying another pair, why not just use what we have?

Tape off the top and the cord. Prime it. And then… TEAL SPRAY PAINT TIME.

use blocks to keep lamp from falling over

I carefully covered the lamp with several layers of thin coats. I wanted it to be perfect. Near the end of all that layering, I needed to spray the bottom of it, so I turned it over but it wouldn’t stop rolling over. I was paranoid that I would come back into the garage to find the lamp broken and crying after falling off the box.

I added two little wood scraps on both sides to keep it intact. The lamp didn’t fall off, so I guess it worked!

teal lamp

I can’t believe how grainy this photo is. It can get dark in the living room when all the shades are pulled down and most of the time, they are, because the houses next to us are too close for our liking. We will need to add frost to the windows to give us more privacy, and then I will keep them pulled up much more than I do now.

But anyway. Look at the teal lamp!

teal lamp

Remember, they’re teal, not blue like they seem to be in these photos. Cameras hate teal.

The teal lamp just works beautifully in the living room. It adds COLOR and LIFE – two things our living room needed. Now, with the addition of some colorful pillows and some more color touches here and there, it will all work together.

Okay, let’s talk about the lamp shade. In the photo above, it looks great and white. But in real life, it was kinda loose and flimsy and when the light was turned on, it looked sickly yellow.

The lamp shade is from Target as well and I was so excited to finally have heads for the headless lamps, but I hated them so back to the store they went. And I will never (never say never) buy a lamp from Target again, because it is so hard to find decent compatible lamp shades for them.

Here’s why:

kinds of lamp shade types

graphic from LAMPS USA

Most lamps require a spider/harp fitter shade, but Target lamps use slip UNO fitter shades. Then what happens? You tear your hair out when you can’t find a cute slip UNO fitter lamp shade for your stupid lamp.

I did some research to see if I could convert the slip UNO fitter lamp into a spider/harp fitter lamp. Behold.. this tiny apparatus.

Slip Uno Adapter Harp Converter Lamp Shade Uno Euro Fitter

It’s called a slip uno adapter. The amazon description explains it well:

“Slip Uno adapters are made to fit directly over a plastic lamp socket found on lamps usually purchased at places like IKEA. This adapter will then let a harp attached to it. Then it will allow you to use nearly any replacement shade on that lamp. This is meant to be an alternative to the lampshade which has fitter already attached to it. You can now easily attach a harp to a lamp without one.”

Cool, right? But it costs $10. Yes, $10 for that tiny thing. Plus $4.18 for shipping. Then I will also need to purchase a harp and then… the reason I’m doing all of this work… a lamp shade.

*EYE ROLL*

I did some more research and one website (HERE) calls the little circle thing a “saddle” and says it should be 50 cents. What? Really? That sounds slightly better.

I’m going to make some calls to local lamp shops and let you all know how it works out. If you have any tips, bring them my way! Otherwise… give me good vibes.

Closing off this with a cute little Instagrammed photo of the lamp! Yes, we finally got a iPhone and hell didn’t freeze over. As far as I know, at least!

teal lamp

Some ideas for your next DIY rug!

I love rugs. I especially love rugs that have a bold pattern. I really love the rug we bought for our living room – it brought the room to the next level.

(Lol at these unfilled frames. I really gotta get going on these very soon!)

But rugs can be expensive. We were lucky to snag our rug on sale, but it still wasn’t a drop in the bucket. That’s why I’m really in love with the idea of a DIY rug. The possibilities are endless… and it’s 100% custom!

We need a large rug for our game room and I think DIYing a plain rug will be a great move.

We all know the results can be beautiful, as evidenced from the following rugs that were made over by some amazingly talented people:

Cristi of Charm Home Design made this rug for her son’s nursery using contact paper.

diy rug pattern

McLaura of Ramblings around DC and Beyond made this rug with a homemade foam stamp. Clever!

diy rug pattern

Ainhoa of A Little Bite of Everything made this rug using a stencil that she made. Go over to her blog to download the template!

diy rug pattern

And who can forget this gorgeous rug painted by Hayley at Hayley Anderson Photography ? She used lots and lots of green tape.

diy rug pattern

Inspired by these (and many more others) rug creations, I’ve been keeping an eye out for great rug patterns that I can emulate. Here are a few that I’ve pinned. (Follow me on Pinterest!)

This rug from the May/June 2011 issue of Lonny is just beautiful! This could be done with a homemade stencil.

diy rug pattern

That issue was full of gorgeous rugs, actually. Here’s another one that I liked – this would be great for a playroom or a nursery.

diy rug pattern

It would be a lot of work (and lots of tape!) to make that one, but it could turn out to be very cool. The hexagons could be bigger to make it easier, and the colors limited to three or four shades.

I also love finding great patterns on painted floors, like this one from House Beautiful:

diy rug pattern

That could be a sweet rug!

I like to look at rugs that are for sale and dream about DIYing them…

Like this rug from Weego Home. It’s fun, it’s funky, and it’s out of my budget at $1495.00.

diy rug pattern

But wouldn’t that be fun to make? It would definitely have to be a free-form job, so if you’re good at free-form drawing or painting this would be the perfect DIY rug design for you.

I liked this simple striped rug showcased by Molly at molly loot:

diy rug pattern

The colors aren’t all that great, at least to me, but I like the addition of an extra tiny stripe every other thick stripe. With some great colors, this could be a cool DIY rug design.

And it seems like I can’t do any kind of round-up without including something from West Elm! This cute rug could be very easy to DIY – and you wouldn’t need a stash of tape or a stencil. You could just wing it and come up with something similar.

diy rug patternAll I’ve gotta do now is to find a really large, plain, light-colored flat-woven rug. Easier said than done, but I’ll find it… somehow, someday, somewhere.

Have a great and productive weekend! I’m hoping to make some serious progress on the laundry cabinets