New Ceiling Light: High Enough For Our Tallest Friend

Last week, something really horrible happened. A hit-and-run accident resulted in one of our good friends’ untimely death. Mark Gobble, a Ph.D. student about to complete his dissertation, a newly hired professor at Boston University, an owner of a skateboarding company, a family man, and probably the coolest guy we’ve ever met, died last Sunday. Needless to say, it’s been a tough time.. and even tougher for his wife and two children. You can read more about him in this blog post written by his niece, Brooke.

The world feels different without him, but the world still spins. It still moves around the sun. Janella still wakes up every morning at 6:30 AM with angry demands for milk. And so we must go on.

Mark was really tall – he was around 6’4. Nick’s 5’8 and I’m 5’4 (both rounded up numbers). When Mark came over in October to bring a meal from him and his wife to help feed me and Nick when we just had Janella, we had a conversation about new ceiling lights and how we needed one for our living room, which had a boob light at the time.

We told him that he was our tallest friend in Austin (we have another 6’4 friend who lives in New Mexico.. Hey, Jesse!) and asked him how tall he was… so we could make decisions on ceiling lights and how high they should be in order to accompany him. Since he was taller than everyone else, we could be confident that the ceiling light would also be high enough for every other friend we have.

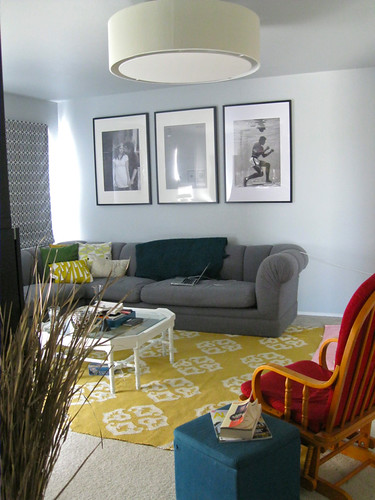
Well, Mark – we finally installed our new ceiling light in our living room. It looks beautiful… and it’s 6’8 off the ground. Definitely tall enough for you.

Thanks for bringing us to Austin. Thanks for your humor, your intelligence, your grace, your generosity, and for being our friend. We’ll never find a cooler friend than you… or a taller one.

FYI – The photos are NOT styled at all. We’re still missing one side table and we still need to set up our newly sprayed teal lamps with new lampshades. And I didn’t feel like putting away the baby toys. Ignore all of that. Focus on the ceiling light.

IMG_2484

IMG_2485

IMG_2487

To see what our living room really looks like when it’s not cluttered, check out this post.

The ceiling light is HUGE. I mean, H-U-G-E. Gigantic. It’s around 34 inches across. And we love it. It’s perfect. Especially when this was our inspiration photo, from Decor Demon:

I was afraid that it would make our ceiling feel lower, but it doesn’t! I’m really happy with it.

One thing down, only 327,121 more things to do left! PROGRESS.

My DIY Painting on Plywood

Once the gesso on the plywood dried, I was ready to start painting!

But first, I needed to look at some inspiration. I opened my pinterest “art inspiration” board and just looked through it.

art inspiration pinterest

I also grabbed a thank you card that we recently received and set it in front of me, because when we got the card we really loved the colors on it.

IMG_1943

Then I rummaged through our paint stash. We have a nice collection of paint – some leftover paint from our walls, our furniture painting projects, and many paint samples. I looked for different colors that were similar to the thank-you card.

And then I just… put brush to plywood and started painting.

painting, first draft, on plywood

This was the first stage of the painting. It was okay, not too bad. I didn’t really like the green — it was a little dreary and I wanted something cheerier, but that was all that I had.

Actually, the way the paint flowed on the plywood… it was all dreary. It looked like things were going downhill… like something was melting.

Then I stared at it some more and flipped it around.

upside down painting on plywood

Much better!

Maybe you don’t see much of a difference, but it just made me feel good about where things were going and I stopped for the day. I knew it wasn’t done, but I wasn’t sure what to do next.

The next day, I took the painting out again and looked at it.

And looked at the thank-you card again.

I felt that it needed something more, a bright color. Oh, orange – I had some left over from the orange closet. So I grabbed that and at the same time, saw glossy black paint and glossy white paint. Hmm, why not.

First, I added some orange and black… and it immediately looked better. I also laid the orange paint on as thick as I could to add even more texture.

adding black and orange to plywood painting

And then I added some white… and I was done!

completed painting on plywood

Wanna see the progression of the painting in photos that are horribly lit? Here you go!

progression of painting

Here’s a close-up so you can see the texture. For future paintings, I definitely want to experiment some more with texture using gesso using different materials.

texture of painting on plywood

I was done but the paint looked dull. The black and white paint, which were gloss paint, looked shiny but the rest, which were mostly in satin or flat, looked… well, flat. I asked my artist mom and she suggested me to use varnish. I found two different kinds of varnish spray at Michael’s – one for oil and acrylic paints and one for general purpose arts and crafts. Since I didn’t use acrylic but latex paint, I decided to use the general purpose one.

varnish general purpose

It worked great – the paint perked up and it’s all shiny and nice now!

Where did we put it? In this weird corner that rests between the living room, the dining room, and the mini-hall that leads to the bathroom and guest bedroom:

plywood painting on wall

I know, bad photo. It’s dark in this corner. I would love to someday add a light at the top of the wall, but we’ll see.

We’ve been talking about putting up a couple of art/frames here to jazz up the corner and to make the thermostat less noticeable. So far, we’ve put up a simple white clock (which has done wonders since we didn’t have any other way to tell time while at the first floor ever since we gave up our DVR) and this painting.

I want to do another plywood painting but this time with very thick and textured gesso and in a tiny size and maybe one color to put right above the thermostat to fill up that space. I also want to find a cute little ottoman to put at the bottom of the wall with a little box underneath to hold all the kitty toys. The cardboard box that’s there right now just won’t do.

Anyway – back to the painting. How did I hang it up? Easy…

using a tab from a can to hang up painting

I hung it up using a tab that I pried off one of our Ginger Ale cans that we save in the refrigerator for sick days. I found this great tutorial and this confirmation by Apartment Therapy that it worked, so I tried it and let me tell you… IT WORKS! It’s very nifty.

I think I’m going to save all the tabs from now on… it’s too bad we don’t drink soda when we’re not sick. Maybe we should start buying canned beer instead of beer in glass bottles…

My verdict: Plywood works great if you already have some lying around. If you want to buy some just for the sole purpose of making paintings, try to get hollow plywood if you can find them so they’re lighter. In small sizes, like my painting here, their weight is just fine. I mean, if a tab from a can can hold it up, it’s not that heavy.

One DIY painting down, 321 DIY paintings to do. I’ve got plans…

Tutorial: How to Prepare Plywood for DIY Art

plywood

I have a few ideas for DIY art for my home, but pre-stretched canvas can get expensive fast.

Allow me to demonstrate. A standard 4 feet by 8 feet birch plywood, 3/4 inch, will probably cost you around 40 bucks. A pre-stretched canvas in the same size might cost you around 150 to 250 bucks, depending on the quality of the canvas and where you buy it.

Now, if you cut up that piece of plywood into four 2 feet by 4 feet pieces, you would have four surfaces ready for artwork for the same price: $40. To buy a 2×4 (or 24×48, in inches) canvas, you would have to fork over around $20. For four canvases, $80.

I want to do a painting for the space above our bed with plywood and latex (wall) paint, but I wanted to see if these elements would work well in creating an art piece. I didn’t want to do all the work just to end up with a disappointing result.

(Why latex wall paint? Well, I have a very specific color palatte that I would like to use for the painting for the bedroom, but I have no idea how to mix acrylic paint colors. I’m not an artist. It’s easier to get the specific colors I want from Home Depot than mixing them myself.)

I found a small piece of plywood smiling up at me in the garage so I said to it, “Plywood, you shall be experimented upon.” Don’t worry, no plywoods were harmed as the result of this experiment.

IMG_1656

I started with a piece of plywood, gesso, sandpaper, and wood filler. Not pictured is primer spray paint.

The first step was to make it smooth as can be. My plywood had splinters on the veneer, so I tried to sand them down with grit 80 sandpaper, but the splinters didn’t go away and I created new splinters.

IMG_1660

I tried 120 grit sandpaper and it worked so much better! Too-high grit sandpaper and plywood don’t play well with each other, apparently.

IMG_1661

Some really big splinters were filled in with wood putty.

The edges of the plywood are… well, it’s plywood, what do you expect?

IMG_1658

I read somewhere that you could add wood putty to fill in the edges to make them look more solid. I thought I would try it.

IMG_1663

I let it dry completely and then sanded it.

IMG_1868

Not perfect, but much improved.

Then I primed one side with primer spray paint, along with the edges. I ran out of the primer so I couldn’t do the other side, but that was fine because I wanted to experiment with gesso and see if it was better to apply primer on plywood before adding gesso or if primer was really unnecessary.

Finally… it was time to put on the gesso!

(If you’re wondering what gesso is, read this.)

See how thick it is:

IMG_1907

That’s from the seal on the bottle. So thick. You can use it to give your painting some texture, like I did on one side (more on that later). You could thin it out with some water if you want a smoother coat.

IMG_1910

See how thick it is. And you can see the primed side of the plywood in the above photo.

Then I just used a small paint brush and put the gesso on the plywood – thickly. I wanted to add some texture to the final painting.

IMG_1914

And on the other side (which was unprimed), I brushed the gesso on carefully to make it as smooth as I could. I wanted to see which application looked better. After two coats, it looked like this:

IMG_1918

It’s not as opaque as the primed side, so I had to do a third coat. it’s now 100% white but the texture is a little weird, almost like the wood buckled a little in some areas, a little wavy. I would definitely do the primer first for future plywood paintings.

Ok, finally ready to start painting!! I’ll show you the final result and how I got there in a later post. This post is too long already!

I won’t hestitate to do future DIY art on plywood. It’s pretty easy to do and the savings are great! But sometimes there are great sales on canvas that I just can’t pass up… such as this one at Michael’s:

photo-11

Buy one at regular price, buy second one for a PENNY. Isn’t that crazy?! I think I will stop by there tonight and pick up a couple. Why not?

(Check out your local Michael’s if they have this sale, too. This sale lasts until May 19.)

Friday Randoms

Another day, another week, another month. Every time I stop and realize that it’s Friday, I’m amazed at how fast the week went. And then I realize that I haven’t even blogged anything or done anything that could fill out a complete blog post.

Hence, I’m trying something new here. Friday randoms, where I stop and look around and groan at our slowpoke process at making this house our home. Here goes!

The first thing I’m going to do after I finish this blog post is to order this pendant light for our living room:

Oversized Equator Pendant light cb2

I am so excited! I will have to put away a few months’ of spending money to get this, but I know it will take our living room to the next level. I’ve been looking for the perfect light fixture for that room since I wrote this post.

I’m still plugging away on the laundry cabinets… well, I should be honest and say that I’ve abandoned the project for two weeks now. I keep on saying, “It’s too late into the day now, I will do it tomorrow, I WILL!” and then I don’t. It’s the last lap around the track, but when you’ve run 1,000 miles, the last lap is the hardest.

laundry cabinet doors

I will finish it this weekend. I will. I WILL.

After all, the cabinet frames have been completed since April 11.

painted cabinet boxes laundry room

Poor, patient, and lonely cabinet boxes. I’m sorry, guys. You’ll be reunited with your beloved doors soon.

Remember the art I want to work on for our master bedroom? I have several large pieces of plywood in the garage waiting for me to get started on it, but I wanted to experiment on a small piece to make sure that it will look good. So far, I’ve sanded it, added wood filler, and primed it on one side. Next, I will add gesso on both sides and see if the primer is really necessary.

plywood art experiment 1

Once that little project is done, I will update you all and hopefully have a tutorial on how to do DIY art on plywood!

Back to the laundry room – we haven’t put up the art that I made on the wall because we wanted to experiment with templates first and see what layout would look the best. I originally thought we would have the four frames in a grid (two on top, two at bottom), but it didn’t look right with our short ceilings and the second row was too close to the floor. We realized that we were planning to remove the door anyway (to bring in more light to the game room), so we could use the whole wall and line up the frames, side by side.

templates for frames in laundry room

Looks great! We will put them up this weekend. I hope. Sometimes weekends have a way of fooling you on Fridays into thinking that it’ll be long, productive, and full of events. And then on Sunday night, you look up from your laptop when you’re sitting on the sofa and realize you’ve done nothing all weekend. No? Just me? Okay.

Oh, we used wrapping paper to serve as our templates to determine the location of our frames. It worked very well!

Our girl Janella loves strawberries. At the end of a strawberry eating session, she looks like Dexter, according to Nick.

janella loves strawberries

Janella is working on her crawling. She’s not there yet, but she definitely can move forward towards something she wants. However, you need to put the right thing to entice her into crawling/lunging forward. Put a toy in front of her, she will give you a blank look. But if you use a necklace, a working phone (somehow she knows the blackberry I give her is broken), a camera, or a leather purse, you’ll see her move with determination.

I found some redness on her knees, so I told Nick we needed to buy baby legs. But I read in this fun book that I could just cut up some old socks and put them on her legs. I tried that with a pair of argyle socks that I never wear and they look mighty cute on her legs!

baby legs from cut up socks

I’m gonna cut up more socks now. It takes 3 seconds to do – my favorite kind of DIY project.

Oh, and do you see that cute white/gray/yellow pillow in the photo above? Nick gave that to me for my 30th birthday. Love it.

Last AND least, I’m eating this greek dip right now. It’s really good and aside from lots of chopping, it’s ultra easy to make. I mean, if I can make it while entertaining a watermelon-eating baby, anybody can make it.

making greek dip

The end. I wish you all a great and productive (or lazy, that’s good, too) weekend.

The Case for Baskets

When I was preparing for the baby’s arrival, I knew that we would need baskets and boxes and all that stuff to corral ALL THE BABY STUFF but I didn’t exactly understand just what the STUFF would be, so I couldn’t just go out and start buying random baskets.

Instead, I waited and gave it a few months. It was worth it, because it helped us figure out exactly what to buy and what to skip. I’m not done yet and I know the STUFF will increase as Janella gets older, but this is a good start for us.

Come and visit, why don’t you. Check out the nursery closet…

orange closet green boxes organization

First – the clothes! Janella is six months old and obviously doesn’t fit in her newborn or 0-3 months clothes, but still fits in her 3-6 months clothes. Yes, she’s a thin one. 50% in height, 10% in weight.

The green box (from IKEA) on the right is filled with newborn and 0-3 months clothes. The one on the left is pretty much empty and waiting for the next batch of t00-small clothes. These little cute boxes do the job! No need for huge plastic bins. For now.

green boxes closet

Janella’s stash of toys were getting out of control, so we found a couple of spots around the house to keep them contained. These two cute purple mesh baskets were found at Home Goods and they store toys that Janella isn’t currently playing with (we rotate out toys).

purple wire baskets closet nursery

Okay, back up a little to re-enter the nursery. This little picnic basket with teal stripes were picked up at Target and holds all of Janella’s cloth diapers.

diaper basket nursery

I know what you’re thinking. A picnic basket?! But it is the perfect solution because I wash these diapers almost everyday and it’s hard to empty out the dryer with a squirming baby in one arm. With the picnic basket, it’s easy to just pick it up by the handles, dump the diapers in it, and transfer it back into the nursery. Plus, it’s cute and it will still be useful when I’m done with diapers. When will that be, by the way? I wonder…

I can’t move on without telling you about the colorful bag you see in the basket. It’s called a wet bag and it is an ESSENTIAL item to have if you use cloth diapers. It’s waterproof and seals in all odors. I can’t imagine using cloth diapers without these bags. You can find them at Amazon – we have three of this.

Okay, now turn your head a little to the right and you’ll find a cute green laundry basket with a cute baby in it.

green laundry basket janella

I have a confession to make: Janella’s not always in it. So, the basket isn’t always this cute.

Nick found the basket at Target and brought it home without consulting me. I was two weeks postpartum… It was a risky endeavor but he did a good job. It’s the perfect size for all of Janella’s tiny clothes and when it’s full, it makes a full load.

Lest you think that I’m some kind of organized guru with 1,000 baskets that hold all kinds of categories of stuff, let me show you what it looks like under the daybed in the nursery. (I haven’t told you about the daybed, have I?)

sad area under daybed nursery

Yep. Time to get some more baskets. I’ll measure the space and put the measurements in our iPhone to help us find the perfect baskets that’ll fit in there perfectly. For now, just don’t look under there. Thanks.

Since we spend a lot of our time in the living room, it’s where we store the majority of Janella’s toys that she plays with these days. For a while, we just dumped them in a corner or in a baby swing, but that got annoying fast. We realized that we had two old teal ottomans that were holding random things like old letters and blankets, so we emptied out one and chucked in all the toys in there. (I want to reupholster them, but you know, later.)

ottoman in living room baby toys

It’s perfect.

toy storage ottoman living room

At least, for now. The time will come when this little ottoman won’t be able to contain all of her toys. It will be a sad day…

The other ottoman is residing in the weird space between the TV set and our side table.

sad area in living room

It feels like wasted space. The space is actually bigger than what it seems like in the photo above. It would be great if we could fit in a chest under the window that holds blankets, toys, etc with a soft cushion to sit on. Something like this:

chest under window

via

If you’re looking for baskets, boxes, and that kind of stuff, some great sources include IKEA, World Market, Home Goods, and sometimes Target.

There’s a couple of green baskets at Target that I’m itching to get my hands on but I’m waiting for them to go on sale. Will I win? Or will I lose when they go out of stock without going on sale? I don’t like this game.

So. That’s the story of how I got my act together and organized everything. And by everything, I mean only a few things. I guess I need to buy more baskets and boxes.

Before I leave, I want to say a heartfelt THANK YOU to all of our family and friends for the gifts and hand-me-downs that you’ve given to us. You’ve been amazing and we’re so grateful. XOXO

The Story of the Headless Teal Lamp

Remember my spray paint mania? Well, it’s still going strong.

I ended the last post with this photo as a hint…

lamp in living room

I thought it was really obvious but nobody guessed it correctly!

I’ve had these headless lamps for a long time now…

They are beautiful and a smoky purple color. I bought them for our master bedroom, but the side tables we got later on were too small for these lamps.

So they were just hanging out in our office, doing nothing.

We had nowhere to put them. I thought they would work in our living room, but they added absolutely nothing to the room. The room needed more COLOR other than yellow and the lamps just didn’t do the job.

We looked for a great pair of teal or blue lamps, but couldn’t really find anything we liked or in our price range.

And so… you know what’s coming.

glass vase waiting to be spray painted

Yep, I decided to experiment on one of the lamps and spray painted it the same teal I used on The Thinker!

At first, it felt crazy to be spraying such nice lamps. But they were lamps we had no use for. And they were pretty inexpensive — we got them from Target. Instead of buying another pair, why not just use what we have?

Tape off the top and the cord. Prime it. And then… TEAL SPRAY PAINT TIME.

use blocks to keep lamp from falling over

I carefully covered the lamp with several layers of thin coats. I wanted it to be perfect. Near the end of all that layering, I needed to spray the bottom of it, so I turned it over but it wouldn’t stop rolling over. I was paranoid that I would come back into the garage to find the lamp broken and crying after falling off the box.

I added two little wood scraps on both sides to keep it intact. The lamp didn’t fall off, so I guess it worked!

teal lamp

I can’t believe how grainy this photo is. It can get dark in the living room when all the shades are pulled down and most of the time, they are, because the houses next to us are too close for our liking. We will need to add frost to the windows to give us more privacy, and then I will keep them pulled up much more than I do now.

But anyway. Look at the teal lamp!

teal lamp

Remember, they’re teal, not blue like they seem to be in these photos. Cameras hate teal.

The teal lamp just works beautifully in the living room. It adds COLOR and LIFE – two things our living room needed. Now, with the addition of some colorful pillows and some more color touches here and there, it will all work together.

Okay, let’s talk about the lamp shade. In the photo above, it looks great and white. But in real life, it was kinda loose and flimsy and when the light was turned on, it looked sickly yellow.

The lamp shade is from Target as well and I was so excited to finally have heads for the headless lamps, but I hated them so back to the store they went. And I will never (never say never) buy a lamp from Target again, because it is so hard to find decent compatible lamp shades for them.

Here’s why:

kinds of lamp shade types

graphic from LAMPS USA

Most lamps require a spider/harp fitter shade, but Target lamps use slip UNO fitter shades. Then what happens? You tear your hair out when you can’t find a cute slip UNO fitter lamp shade for your stupid lamp.

I did some research to see if I could convert the slip UNO fitter lamp into a spider/harp fitter lamp. Behold.. this tiny apparatus.

Slip Uno Adapter Harp Converter Lamp Shade Uno Euro Fitter

It’s called a slip uno adapter. The amazon description explains it well:

“Slip Uno adapters are made to fit directly over a plastic lamp socket found on lamps usually purchased at places like IKEA. This adapter will then let a harp attached to it. Then it will allow you to use nearly any replacement shade on that lamp. This is meant to be an alternative to the lampshade which has fitter already attached to it. You can now easily attach a harp to a lamp without one.”

Cool, right? But it costs $10. Yes, $10 for that tiny thing. Plus $4.18 for shipping. Then I will also need to purchase a harp and then… the reason I’m doing all of this work… a lamp shade.

*EYE ROLL*

I did some more research and one website (HERE) calls the little circle thing a “saddle” and says it should be 50 cents. What? Really? That sounds slightly better.

I’m going to make some calls to local lamp shops and let you all know how it works out. If you have any tips, bring them my way! Otherwise… give me good vibes.

Closing off this with a cute little Instagrammed photo of the lamp! Yes, we finally got a iPhone and hell didn’t freeze over. As far as I know, at least!

teal lamp

Spray Paint Mania

Do you get spray paint mania? Right after you spray paint something and you remember how easy it is and you love the result, you go foraging around the house looking for things you can spray paint.

I’m in the middle of a manic episode right now. I’m even considering spray painting my dining table. Fortunately, there’s a wise guy here named Nick who will stop me from committing this madness.

But nothing is stopping me from spray painting things that don’t work in our house in their original state.

It all started with this little project:

the thinker and the cat, before

The Thinker and the Snobby Cat were both Home Goods finds. We grabbed The Thinker a long while back for the office and I planned to spray paint it white, because it was just too dark and we don’t need any more gray things in this house. The Snobby Cat is a recent find and it was too silver – the kind that looks cheap. It looks better in the photo than it did in real life.

My original plan: turn The Thinker into a white statue and paint the Snobby Cat a cool orange.

I gave both mini-statues a coat of primer. This step changed everything.

The Thinker just didn’t look good in white. It made him look fat… well, not really. He just had too many dents and dings and he looked weird. This photo shows this, but this was after the first coat of teal spray paint.

The Thinker doesn't look good in white

Sorry to ruin the surprise but we decided to make him go teal.

Also, the white primer on the Snobby Cat looked really good and I decided that he had to get a lighter color than orange. What about a bright yellow?

Snobby Cat turns yellow

He’s still snobby, but he looks better doing his snobby thing.

Here’s The Thinker in all of his teal glory.

The Thinker goes teal

Why does my camera curse me so? That’s not teal, that’s blue, camera!

Here’s the same photo, edited heavily to show you the real teal color that it looks like in real life.

This, but only darker.

Well, this is a really simple project (spray paint projects always are) but let me tell you something that I learned…

Rust-oleum spray paint is the best.

rust-oleum spray paint is the best

It coats BEAUTIFULLY… Just be sure to shake the can constantly as you spray. It costs slightly more, but it’s worth it. It’ll be the only spray paint I’ll use from now on – if the color is right. I just wish they had more colors!

The Thinker was sprayed with Rust-oleum Satin Lagoon and Snobby Cat was sprayed with Rust-oleum Gloss Protective Enamel in yellow. Both great, bright, saturated colors.

The pair is now happy in their new home – the Expedit in our game room.

The Thinker and Snobby Cat in their Expedit Home

The nice thing about creating a home with a good color flow is that these things can be put in any room and still look good. So, even though they look good in the expedit right now, they might make a move sometime in the future.

Remember what I said about my current manic episode? Well… guess what I’m working on right now. Here’s a hint:

In other news – I hope you had a great Easter weekend!! We spent ours at the park and it was perfect. Mounting Bloggif

Finding a Home For My Swirly, Colorful Painting

I thought it was time to get started on the art for our living room. I saw this beautiful art installation at an Anthropologie store in Austin (at the Domain) and I wanted to recreate it for our home.

art at anthro

It’s much more majestic in person – it’s huge, spanning the entire wall behind the cash registers, and it’s outlined in gold paint.

But I didn’t want to get started on this without doing a test drive first. What if it didn’t look good in our living room? And what colors would I use?

So, I did a much smaller version of the artwork.

sketch for art

With the help of the photo of the artwork on the laptop, I sketched out this outline. But before I put pencil to paper, I put tape to define the art space and to divide it into three parts to fit into our three large frames in the living room. If you look closely, you’ll see the tape – along the bottom, the top, and between the three sections. You can see the tape better in the next photo.

tape on painted artwork

It was hard trying to choose the colors I wanted to use. I also was somewhat limited by the acrylic colors I had and they didn’t take too well to color mixing, or I don’t know how! I wish I took color theory or something in college. I took a bunch of drawing classes, but no painting ones. Regrets, terrible regrets.

The tape was really helpful when it was time to paint. As you can see above, I painted over the tape and then it was easy to remove the paint from the tape. All I did was to add a bit of water to the tape and then wipe it away with tissue.

no paint on tape anymore

I wasn’t completely happy with the color choices I made, but this is what I ended up with:

completed artwork... hmm

Now it was time for the big test. I brought it to the living room and held it up to see how it would look in the space.

My face looked like this:

Old photo of Janella - from late November, when she was around 6 weeks old. She was so tiny!

It didn’t look right. The art was whimsical and the living room was more simple, modern, and had clean lines. The painting, not so much.

But I did like the painting. So, I thought about where else in the house I could put it in. I held it up at different places and finally arrived at my bedroom.

Here’s what it looks like (sorry for the MESSY bed and the blurry shot, I was holding a squirming Janella in my arms).

painting over bed

I think it works better in there, but the bright colors don’t really go with our chandelier. I downloaded a free trial of Photoshop Elements and played around with the colors.

painting over the bed, after photoshop

I think this could work! I can add outlines of silver paint, like how the original art did with gold paint, and paint the sides in silver as well.

I have a few large pieces of plywood in the garage that I’ll use for this project. Since I’ll be using plywood and not canvas or paper, I think wall paint should work just fine. This gives me much more choices in colors without worrying about color mixing!

Off I go to Home Depot or Lowe’s to pick up a few paint chips and figure out a good color scheme.

I’m not sure whether I will be doing a triptych for this room or do it on one large piece of plywood. Let’s see. What do you think? I also plan to add mirrors behind the lamps on both sides of the bed. Maybe round mirrors to offset all the sharp lines. We’ll see…

It’s great how doing small-scale samples can help us make better decisions for our home. Along with the help of technology, of course!

What will we do with the still-empty frames above our living room sofa?

ribba frames

Do another small-scale painting, of course. I think I will try making some swirly black art, like I talked about 3,221 years ago. I thought I should go with something with a bit more color, but my original plan is probably the best one. Funny how that works out.

Iowa is Awesome

It’s awesome to us because that’s where my family lives right now.

It’s also where we’ve been over the past week.

Janella met her favorite cousin, Lily Kate, for the first time. I say she’s her favorite because Janella always stares at her and smiles when she sees her! Aw!

janella and lily kate meet!

I tell you, there is nothing cuter than a 3-year-old fawning over a 5-month-old like an old lady.

And Janella also met another cousin, Joseph Jr., who is only seven months older than her. It was so cute watching them meet for the first time. Even though they didn’t really seem all that interested in each other… But that’ll change before we know it.

janella and joseph jr meet!

I’m really glad that Janella has two great cousins living somewhat nearby (if you consider 14 hours “nearby” but it is to us, with all of our other family living on the east coast).

It was also really nice to finally see mom’s new/old house. I love that house – it has SO much potential.

They’re getting a whole new kitchen installed soon, which will be SO exciting. I forgot to take before photos while I was there, ugh, hopefully mom takes a couple of great photos so I can share it with you all.

Our spring break was awesome… and awesomely long, since Nick got an extra week off due to electrical problems at the school he works at. He’ll have to make up for these missed days, but it was really nice to have TWO weeks off!

Now we’re back home. Nick said that the time at Iowa was a really nice vacation for him, since I wasn’t pestering him to mow the grass or to put up the curtains or some other home-related stuff.

Well, Nick, vacation’s over. Put up them purple curtains STAT!

Home Dreams vs. House Realities

It’s fun to dream, but there always comes a time when you need to determine the difference between what will always be a dream and what is actually possible. And so it is with our house.

My dream is to have wood flooring throughout the house. Real wood – not too dark, not too light. Wide planks. Perhaps they’ll be made of maple. But the reality is that wood flooring is expensive and this house is not our forever home. I’m still trying to figure out whether it’s worth the expense – will we get back what we spent in resale? – or swallow my pride and install economical laminated flooring instead. I need one of these real estate experts from HGTV to come to my home and tell me what the right choice is. I’m still not sure.

Source: feedly.com via elisa @ on Pinterest

My dream is to have a beautiful patio with tiles on the ground and a fan above. Our master bedroom has a window that overlooks the backyard and we’ve been dreaming about changing that window into french doors and adding a balcony right over the patio. How beautiful would that be. I image us sipping a cup (or three) of coffee in our robes (that we don’t own) and chilling on our balcony in the morning dew. But I can’t even imagine how much money that would cost. I still want to put down tiles for our patio and possibly have some kind of shade – a pergola, perhaps? Again, it all comes to resale, it’s not about what I want.

Something to consider is the area where we live. I’m sure that certain improvements count more or less depending on the neighborhood. Right?

There are tons of other examples where my dreams and my reality collide, but these two are what I’m struggling with the most. And we’re also trying to decide which of these projects we should do first. The patio, so we can enjoy our backyard sooner, which we haven’t been doing because there’s nowhere to sit? The floor, so I can get rid of the cheap carpet that hurts my eyes and my heart and that’s probably hiding thousands upon thousands of… I don’t even know what and I don’t care to.

Any advice? Any real estate experts out there? Any offers of free labor? If you just want to commiserate with me, that’s allowed, too.